
Here's her card: Isn't it gorgeous? I loved the way she used the Chevron border punch to create a lattice background simply by turning one upside down and overlapping them.
 For this card, we simply adhered it behind the cut out heart window frame. I have seen other cards with it like that behind other frames. I want to try that too!


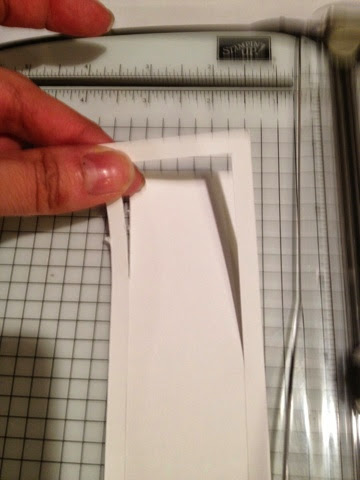
 Left side at 1 3/4", start the blade again at the 1/4" mark. You can also use the little gray point of the cutting blade to match up with your previous cut - that's what I do a lot of times!


 If I got a little glue on it, I just waited until it was dry and it rubbed right off! No glue to worry about on my workspace underneath!

 (If you have never visited this website go there now! "ColorQ" it's awesome!)


Of course, the one thing standing in my way is that I don't own that punch!
What to do?... What to do?
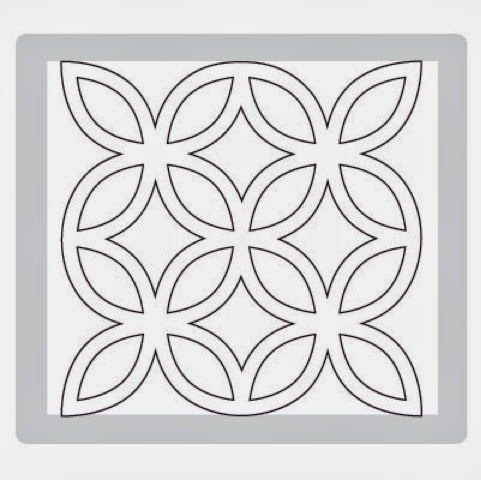
Wait! We have the Lattice Bigs die!
It hardly ever gets any use around here so it's about time I started using it! I did use it at stamp club to make a valentine, remember?
Back to the card I was copying...
(Here's my card without a greeting!)
I cut out the Lattice die with my Big Shot and cut it in half. At this point, I could glue it right to the card vertically to create a lattice.
But I really liked the look of the lattice behind a frame! Hmmm... I could take a piece of white card stock and punch out squares repeatedly to get an open window...
But when I did that there was no way to see if I had my punch evenly spaced on the card stock.
So I used my paper trimmer and cut out the window.
I will explain to you how I did it. I hope it makes sense! I know that it would be so much easier to follow with a video but my son's video camera broke! So it will be picture tutorials until we get a new one!
I used a piece of white card stock that measured 2" x 5.5". On my paper cutter, I moved the left side of the white card stock down a quarter of an inch to 5 1/4". I lifted the ruler and moved the cutting blade so that it was on the 1/4" mark - that way it wouldn't cut the end of my paper but rather start 1/4" inward. I then cut with the blade, moving it downward, but stopped 1/4" shy of the end (at 1 3/4 " on the ruler).
By the way, be sure to use the dark gray cutting blade on your Stamping Trimmer! That is the one that cuts. The lighter one is for scoring.
I continue to do that three more times rotating the white card stock each time (so that the third cut is the same as the first , and the second and fourth cuts are at these measurements :
On the second and fourth cuts, you drag the cutting blade down to 5 1/4 inches - stopping 1/4" shy of the end.
When I was done making all four cuts , I ended up with a rectanguler frame.
Next I glued my lattice pieces to the backside of the frame. For such a small detailed piece, my Tombow glue really came in handy, because it has that pointy pen-like tip on one end.
I also found that using my silicone craft sheet works wonders when using any kind of adhesive, because nothing sticks to it!
Ha! This is one of those items that has been in a drawer for two years and I am finally using it and appreciating what it does!
You've got to get one!
Even the snail adhesive didn't stick to it if I glued my card together on top of it! No sticky grid paper to worry about! I wish I could get one at every station at the 2/5/15 class, so no one would have to worry about adhesive being on the paper from the last person who was at that station.
A girl can dream...
I stamped a piece of Crumb Cake with the new Hardwood background stamp In Soft Suede ink.
Before the lattice piece was ready to officially be added to the card I added a piece of Midnight Muse stitched ribbon.
I knew that I wanted to use this color combination:
So now for the stamping... I used the Petite Petals stamp set with the coordinating punch ( from the Occasions catalog) in Marina Mist and So Saffron inks.
I also used Old Olive card stock to cut out the leafy branches. That was done using the sizzlet called Little Leaves (for the Big Shot).
I added each flower with a dimensional. I also stuck a medium pearl in the middle of each.
I call this card a "masterpiece" because it was not as quickly done as the other two card we made. I have to hand it Brianna, life would be a lot easier if I had that Chevron Border punch!
But, when there's a will there's always a way!
Just because you don't own something and you see it used on the card don't give up! There is usually always something else you can substitute and come up with something similar.
(Oh! By the way, take a good look at Jen's card in the top picture because she'll never send it to you! Hahaha it's going right on her wall of "cards that too long to make so I'm never sending them to anyone...")
No comments:
Post a Comment