Tuesday, September 30, 2014

What's cookin'?- Beef stew

Autumn is here!
The mornings and nights are a little chillier nowadays. This gives me an excuse to switch my cooking to warmer, "stick to your belly" meals... A little comfort food doesn't hurt every now and again , does it?

I also have a son who spends a lot of time in a cold ice rink on many nights. For sure I have to prepare meals that will warm him when he comes home!

Last week this particular son requested that I make beef stew.

When I was in the hospital a couple of years ago, my mother came to stay for 2 months. 
She was an awesome support system to everyone of us. 
She kept my household running smoothly in my absence. 
She cleaned.
She cooked.
She made beef stew. 
Everyone fell in love with it.

Fast forward to the recent beef stew request... I have made it many times before, but all of a sudden, doubted my method - afraid that it would be too  soupy instead of a thick base. 

What do I do in a time of cooking distress?
 What any girl would do of course... CALL MOM! 

So, here I am on the phone calling my mother (AKA Paula's cooking hotline)...

Mom: "hello?"
Me: "mom. stew."
Mom: "what?"
Me: "stew!"
Mom: "oh, hi honey! Stew? Are you making it the way I always make it?"
Me: "yes, and I will be darned if I can find the recipe! I have a feeling I know how to make it, but I'm unsure and I don't want it to turn out wrong..."

(Turns out I was right all along, but I'm sure it gave her a thrill to help me out. Plus I'm so blessed to be able to still call my mother for recipes, so I do it as much as possible!)

** Aside** 
Have any of you ever seen the movie Wedding Crashers? There is a scene where crazy Will Ferrell (Chaz), who still lives with his mother, asks for meatloaf... "Mah... The meatloaf!"

Cracks me up every time!

My conversation on the phone with her was a little like that, barking orders like "stew!" without even saying "hello" first!

I tried to find a video clip to post here to share, but couldn't find a single one without the "F" word in it. So, if you have never seen the movie and don't know what I'm talking about, just go on YouTube and search "Wedding Crashers meatloaf"...

Anyway... 

If you've never made stew, here's how to make a great one!

•Dredge beef stew cubes in a mixture of flour, salt, and pepper.
• Roughly chop up one onion.
• Add beef and onion to a sauce pot with about 2 tablespoons oil. Cook until meat begins to brown and onions begin to soften.
• Add 1/4 cup red wine to deglaze pan, scraping off all brown bits. Cook until reduced by about half.

• Nex,t you're going to add one box (or 32 ounces) of beef broth. I didn't have any homemade but I have found that I like this better! (Better than Boullion) I just boiled water and followed the directions on the jar as to how much to add, before adding it to the beef/onion mixture.

• Roughly chop up some celery and carrots, add to pot. (I used three of each.)
(As you can see by this picture I like to have bigger chunks of veggies in my stew!)

• Cook over medium heat for about one half hour, or until vegetables begin to soften.

• Broth should thicken due to the flour used on the beef. If it's too "brothy", you might want to add 2 teaspoons of Minute Tapioca:
• In a separate pot, while stew is cooking, cut two large potatoes into cubes. I cooked mine separately in a boiling pot of water until just soft. Drain.

• I also cook my pasta separately (we like bow ties). You can either put on another separate pot for that or just throw them in the boiling water from the potatoes once the potatoes are done. I cook the potatoes and pasta separately so my stew isn't really starchy.
• When they are done I throw the potatoes, the pasta and a drained can of peas into the stew.
• Cook for a few minutes longer just enough to warm the peas.

Mmmmm...
I can feel it stick to my ribs now... and I'm warm!
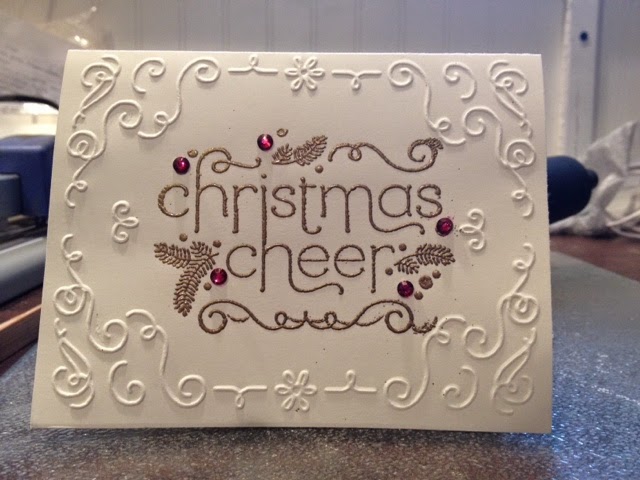
W CMD event: card #3

Here it is!

Come down this Saturday to my house anytime between 11 AM and 3 PM to make three free Christmas cards!

Special incentive for bringing a NEW, ADULT stamping friend!

There are the other two cards in case you missed them:
Hope to see you and any new stampers that you may bring!

Sunday, September 28, 2014

FREE event on World Card-Making Day!

This coming Saturday, October 4 is world Card-Making Day!

I am hosting a FREE event at which those who attend can make three Christmas cards!

I have a special incentive for those of you who bring along a NEW adult stamping friend! I never have my annual "used stamp tag sale", so I have lots of retired sets to give away as rewards!

 Hopefully I will see all the new friends at future classes!

I posted card #1 on Facebook, Pinterest, and in my recent customer email. I realized tonight that it was NOT on the blog, so here it is: 
We will use the new Wondrous Wreath stamp set and matching framelits!

Here is the second card that I have created for my guests to make:
It is a flip card featuring the new White Christmas stamp set and other goodies from the Holiday catalog!

I will post the third card in a day or two so that everyone can see.

Should be fun!

If you are local, plan to stop down any time between 11 AM and 3 PM!

Monday, September 22, 2014

September 2/5/15 cards


You saw a sneak peek of these cards a couple of weeks ago. Now let's take a closer look at each....
-----

#1
Our first Christmas card of the season! (Next month's class will be all Christmas cards!)

Stamps: Festival of Trees BUNDLE (includes stamps and matching punch) 
Found in Holiday catalog

Ink: Garden Green, Early Espresso, Real Red
Other: Gold Shimmer card stock, star from Itty Bitty Accents punch pack, Filigree Frame embossing folder.
( emboss folder in Holiday catalog)

Note: We inked up the whole tree in the Garden Green. Then, we removed the green ink from the tree trunk with a blender pen! Finally, we added a brown tree trunk with the Early Espresso marker.

This is sold as a clear photopolymer set. It will make lining up other set element,s like tree garland, really simple!
-------
#2


I can't believe that I've had this set sitting on my stamp room desk for over a month, and this is the first time I got to use it! 

I love it! (And, so did everyone else!)

It was made with the Flower Patch set and matching framelit

We only used one framelit for this card but there is actually a whole set that matches the stamps:
These two are available to purchase as a bundle so you don't have to buy one or the other. You won't want to do that, believe me!

Inks: Pink Pirouette, Blushing Bride, Calypso Coral, and Wild Wasabi.

Note: This is sold only as a photopolymer set, making placement super easy with the totally clear stamps! Lining up the green stem for a second stamp, in order to make the flower stem longer, was so easy!

Although you can't see it in this picture, the rhinestone was colored with a Calypso Coral Blendabilities alcohol marker before adding it to the center of the flower - perfect color coordination!
-----

#3
Sold as a single wood stamp, Halloween Street, is a great purchase!

Card stock: Pacific Point, So Saffron, Tangerine Tango

Ink: Basic Black (dots were created with a number two pencil eraser!)

Other: Tangerine Tango two-tone trim, and Frosted Sequins (both in Holiday catalog)
----

#4
This card is super fast and easy! I used a birthday greeting, but any can be used. Same goes for matching card stock and t"ink! (I used the retired color More Mustard)

Stamp set: Dotty Angles
----

#5

Stamps: Seasonally Scattered (Holiday catalog)
Ink: Cajun Craze

Other: Needlepoint emboss folder (from Clearance Rack), Lost Lagoon satin stitched ribbon, flower from the Itty Bitty Accents punch pack,  pearls

(emboss folder still available on clearance rack)

This was a great mixture of cards. Keep watching this blog, your email, Pinterest and Facebook for the announcement of the October 2/5/15 Christmas card class and "cards to go"!

If you bought the "cards to go" for this class, they are already in the mail and you should have them by the end of this week!

It's always I'm happy to answer any questions you may have about Stamping Up and Stamping Up product!

Please visit my website and the online store if you're interested in purchasing product.

Be sure to check out the Stampin' Up! blog page too, for plenty of ideas, Weekly Deals (announced every Tuesday) and any new additions!


Friday, September 19, 2014

What's cookin' - Cream of zucchini soup

Not too many pictures for this post, but believe me this is a great recipe! Quick, easy and healthy too!

I this recipe on www.skinnytaste.com. They list calories and Weight Watcher points there if you are interested.


All you need for the soup is:
• 3 medium zucchini, skin on, cut in chunks
• 1/2 onion, quartered
• 2 whole cloves garlic
• 32 oz. chicken broth (1 box)
• 2T sour cream

-Add broth and vegetables to a sauce pot. Bring to a boil.
-Lower heat and simmer 20 minutes, or until all veggies are soft.
-Purée with an immersion blender, or carefully pour and purée in a stand blender, until all ingredients are pulverized and combined.
- Add sour cream and stir.
- Season to taste.

** Before serving, I add grated Parmesan cheese to top and drizzled with olive oil.

** You can make this soup even healthier  by using reduced-fat sour cream and/or reduced-sodium chicken broth!

**Make it vegan without  the cheese and use vegetable broth instead! 

** This soup lends itself easily to being changed up. You can top it with fresh herbs instead of the oil and cheese... If you need a heartier soup, try adding some chopped zucchini (or zucchini noodles!) or yellow squash... Serve it as a beginning to your meal or as a meal itself by serving it with some crusty bread. 

Let your creativity shine!

Enjoy!

Thursday, September 18, 2014

Update: zucchini noodles!

I recently told you about how I mixed pasta with zucchini "noodles" in order to cut down on carbs and use some of the zucchini from my garden.

I used a regular old box grater to make the noodles:
BUT
I wanted to let you know that I finally got the kitchen gadget that will do it for you much more easily.

I went to Bed, Bath and Beyond and asked  for something that makes zucchini noodles... The young girl knew exactly what I wanted! She pointed me in the  direction of this:
THE VEGGETTI!

She didn't pronounce it like the G in the word "vegetable". She said it with a soft G as in "go".

I recommend you do the same...

One of my boys saw my new purchase and pronounced it like "vegetable"... I almost had to wash his mouth out with soap.

Hahaha
You're all saying it right now, aren't you?

Halloween punch class!

Wednesday, September 24 at 6:30 PM
$8/3 cards + envelopes
DEADLINE TO REGISTER IS MONDAY!

I originally advertised a "fall" punch class on this date.

I don't normally do a whole lot for Halloween but I had so many cute punch cards I decided to make a class of just this!

Next month we'll do more fall/Thanksgiving, and then, of course, on to Christmas!

Hope to see you Wednesday!

(if I decide to do a card to go offering for this class I'll let you know on Monday or Tuesday!)

Sunday, September 14, 2014

Upcoming class!

This Friday, September 19 at 4 PM will be my monthly 2/5/15 class.


I thought I would give you a preview of what you're making! It is my intention to continue doing this in the future. I just have to remain organized!

This month we are making a variety of cards: Halloween, fall, general, and one Christmas card. As this type of class dictates, they are all very simple cards, suitable even for the beginner, so invite a friend!

In October we will most likely do more Christmas cards, if not all Christmas cards! Also in October I am planning to offer the "class by mail"  for those who can not attend. (always trying something new!)

If you are planning to attend this class please RSVP no later than this Wednesday, so I can begin to cut paper.

You can RSVP by phone or email - or even by commenting on this blog page!

You will pay $15 and make 10 cards - 2 each of 5 designs!

Envelopes available optionally 10/$2.

Please bring your adhesive to this class.

See you Friday!

Addendum: this class is also now being offered as a "cards to go".

$20 for 10 cards plus envelopes, (includes cost of postage)

Please let me know by Saturday, September 20, 2014 if you want the cards. You can contact me through email with your address and I will give you mine.
Dandyspandy@sbcglobal.net

Wednesday, September 10, 2014

What's cookin'? - Zucchini Noodles with Roasted Grape Tomato Sauce!

These days I'm constantly scouring the Internet or the knowledge of friends for things to do with the over-abundant vegetables in the garden.

My husband loves having a garden and tending to it. We are fortunate that we have the space for a big garden.
 (Note the log cabin shed that my husband is now building in his spare time... The nut!)

We're always trying new things - foods we have never planted before, along with the tried-and-true crops: zucchini, tomatoes, cucumbers, and peppers. 

This year, new foods for us include red cabbage, beets and peas... I thought they were green peas. When I picked some and started shelling them, I did not find a green pea, but rather a black-eyed pea! I guess when we bought the starter plant, the the tag listed them as "cowpeas". Being the naïve planters that we are, we planted them, expecting green peas. Oh well! I cooked them anyway. That recipe I will share on another day!

Some things are still growing and not ready to harvest (like the cabbage). Others are way more prolific than I ever imagined (like the cucumbers!)

That's just the ONE day's picking from ONE cucumber plant in that picture - I'm not kidding! And to boot, my husband always plants about six grape tomato plants and four other tomato plants!

Yikes!

I've given lots away... Thank you Terri, Pat and Patty for taking some off of my hands!

So anyway, I'm sure my next series of food blogs will be about using the vegetables from my garden. Hopefully you will find some new uses for your garden vegetables as well!
-----

Grape tomatoes.... What to do with six plants that keep producing more ripe ones each and every day? My husband can only eat so many off the vine as he works outside (too much acid gives you heartburn!)

I came across this recipe and thought I would give it a whirl...

Grape tomato sauce (makes approx. 2 cups)

• Line a 9" x 13" pan with clean, stem-free grape tomatoes (about 5 cups)

• Before adding 5 fresh, whole garlic cloves to the pan, crush them slightly with the side of a knife.
• Drizzle with approximately 1T olive oil. Sprinkle with salt and pepper. Toss gently to coat.
• Roast for 45 minutes in a 400° oven. Tomatoes will begin to "pop" and release their juices. Don't overcook you don't want a burnt taste to the sauce!
• Once removed from oven, allow to cool (about 20 minutes).
• Put contents of pan, plus about 8 fresh basil leaves in a food processor. Add salt and pepper to season.

• Process to desired consistency. (This solves your problem of having to peel tiny tomatoes - you don't!)

** I heated this on low heat about 45 minutes before we ate it, in order to thicken it up it. (Without heating, the original recipe states that you have 2-3 days to use the refrigerated sauce before it spoils.)

** The sauce was awesome, but I think it could use a sprinkling of sugar to reduce some of the acidic taste - I'll leave that up to you!
** I'm planning to make another batch, heat it through, allow it to cool, and then freeze it for future use.
-----
Of course you could just serve this marinara over any pasta.... But when you have "oodles" of zucchini you make noodles!

Zucchini noodles (or, "zoodles", as I have seen them called) are all the rage right now. I see them in TONS of low-carb recipes. 

Apparently, there is some kind of kitchen gadget that will help you to make zucchini noodles. I don't own one, so this is what I did instead - not as perfect as the gadget would produce but, overall same effect!

When I was ready to drain my boiling spaghetti, I simply poured the hot water over the zucchini noodles which were resting in the colander. That hot water bath was enough to cook the thin strips of zucchini.

Mix it in with your spaghetti or just have the zucchini noodles, topped your favorite way....

Sunday, September 7, 2014

Set Sampler - For All Things


Last week I posted a picture on Facebook of some new product that I had ordered from the new Holiday catalog. 


There is still so much I want to do!!! There are not enough hours in the day! 

But, I did manage to play with the set For All Things the other day. In fact I had every intention of posting this yesterday for "Set Sampler Saturday". But, last night, instead of doing my post as I initially intended, I ended up reading a book from cover to cover. Holy smokes!

So blogging had to wait...

Anyway, on Friday I made several cards using this set. I made all fall cards, but there are several elements that can be used from this set on other occasion cards!

The first is a very simple card, and it is a CASE of a card I saw on Pinterest by Jana Gann. 


The card base is Always Artichoke with a layer of Cajun Craze and Very Vanilla. The leaves were stamped in Hello Honey and Cajun Craze. The acorns and sentiment are done in Early Espresso ink. Burlap ribbon was glued in between the top layers.
----
Card #2 is still simple but involves a little bit of heat embossing. It is a re-creation of a similar card by Stefanie Pletscher:
The card base is Crumb Cake.  The second layer is a piece of Core'dinations card stock (Early Espresso) from the Neutrals pack. I recently bought it off of the clearance rack! I love that "aged" look when you sand it like I did on the edges!

The main image was stamped on Very Vanilla card stock. The inks used were Crumb Cake, Early Espresso, and VersaMark, for the embossed image, which was done with gold powder.

I love the watercolor look that many sets are using this year - this background "blob" can be used with many other sets without really watercoloring (and getting my paper really wet and waiting for it to dry!)
----
My third card was shared on a Facebook group last week by my upline. I loved the colors of it and knew, right away, that I wanted to copy it!

As I was making the card, I once again faced my age old problem: thinking that I own something and I don't.... (I'm sure you've all heard my old story of emailing my downline to see who had a particular  alphabet set of mine - when in fact I really didn't own it, I just thought I did! Whoops...)

In this case it was the yellow (Hello Honey) ribbon! I ordered it but it isn't in my possession yet! DUH!

Well, as soon as it arrives it's going to be added to this card!

See, here is Pam Strobel's original card followed by the one I did: 


It's still looks pretty I just really like it with the Hello Honey ribbon also. Colors of this card are: Lost Lagoon, Hello Honey and Tangelo Twist - ink, ribbon and card stock!

Aren't the colors great? All three of them are In Colors and all five of them (the In Colors) coordinate easily! 

Plus, by stamping the same image repeatedly in different colors, it looks like I used a piece of Designer Series Paper, when in fact it really is just stamped card stock!
-----
The 4th card is not my favorite. 

Did you ever start creating something only to have it end up so busy looking because you used everything that came to mind?

That's this card!

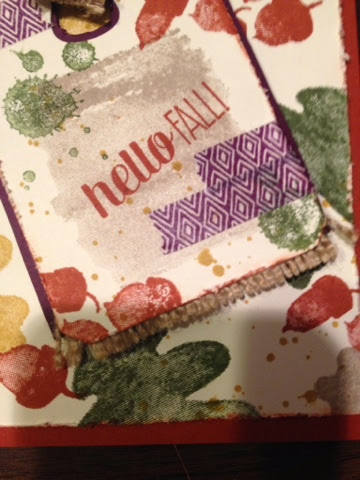
I started out stamping the background. After adding the "splotches" from Gorgeous Grunge, it was too much of the same colors. I tried to break up the color with an accent color (Blackberry Bliss) from the coordinating Color Me Autumn washi tape.

Too much going on!

This one is headed for the trash, for sure!

So, why am I bothering to post it then?

I just wanted to show you what I did with the burlap ribbon!

It looks great when you fray the edges by simply pulling some of the fibers out...

And those loose fibers are used like linen thread in tying this not together!

In my opinion all is not wasted because I have found techniques to use on other cards.

Besides, I don't want you to think that I never make cards that end up in the trash!
-----
Be sure to check out the online store, weekly deals, clearance rack, and new photopolymer sets on Stamping Up's website! You can get there by following this link to my website and clicking on "shop" in the upper right-hand corner: