Monday, December 29, 2014

M (Monday) is for.... MPP!

I am always in awe of the ladies who blog every single day!

Each day of the week seems to have an alliterative theme... You know like, "Wacky Wednesday", "Freebie Friday" etc.

I wish I had the gumption to do the blog every day... I just don't! 

I started blogging about this time last year because I was no longer working and I was B-O-R-E-D at home. I do it because I enjoy cooking and sharing yummy recipes! I blog because I like showing off what we have made with Stampin' Up! supplies, and show that YOU can make it too!

I'm not technologically advanced enough to add all of those fancy doo-dads to my blog. 

All in all, it's a pretty simple and straightforward endeavor! 

I write on there to share with everyone and to "keep in touch" with those that are far away. If I get a new reader or Stampin' Up! customer along the way - that is wonderful! But really, I just do it to keep busy.

So, as I get ready to begin a second year of this blog, thank you for being a loyal reader/customer/friend!
----
So what does "M" in Monday stand for?

Today it stands for MPP - My Paper Pumpkin! MPP is a monthly craft kit that Stamping Up offers. Sometimes you make cards. Other times you get to try your hand at various paper projects!

Each monthly kit cost $19.95, shipping and handling fee included.

The kit contains everything you need: paper, ink, rubber stamps, embellishments, etc. You'll receive a clear block with your first kit so that you can use it and all subsequent kits.

You can buy a pre-paid subscription or pay by the month! You can stop your subscription anytime, and you can even pause the  monthly delivery (for whatever reason).

I have been very pleased with all kits that I have received since I subscribed back in June. What is even more fun these days is, the last two months I have assembled my kit with a friend (or friends)! I'm hoping that our MPP group continues to grow, because it is so much fun to get together to assemble your kits!

For more information, to subscribe, or to purchase a pre-paid subscription (it makes a great gift!) please follow this link:
If you choose to subscribe, I would be thrilled if you listed me as your demonstrator!

What I like about MPP is that you don't have to be a rubberstamper or even a crafter to complete each kit! Everything you need is in that little red box! SU! even has a video online if you prefer watching over reading instructions.

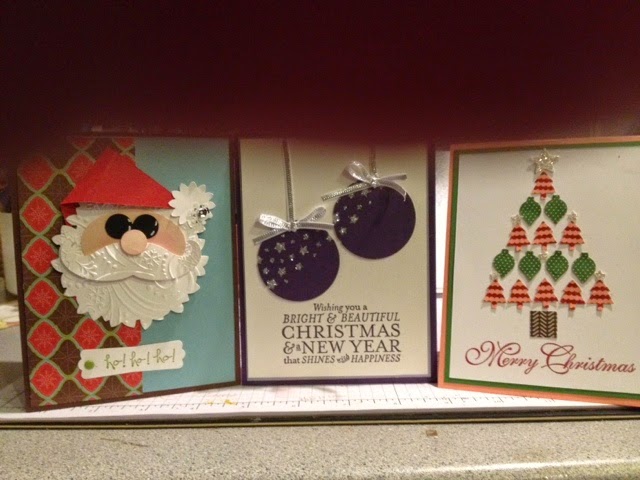
Anyhoo... the kit that arrived in December was called "All Shook Up":

The kit included everything you need to make nine of the really cute shaker cards shown!

Upon opening the box, before I even removed the supplies for the shaker cards, I saw that Stampin' Up! included a free gift!  I guess, because it was Christmas time? Aren't they wonderful?!
Cool beans! Essentials Paper Piercing pack!

Nancy, Patty, and I had lots of fun putting these cards together!
I even have some stars and sequins left over so I can embellish a little more if I so choose!

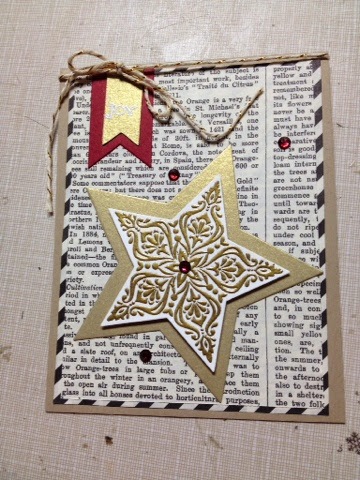
There is a card we found on Pinterest made with the leftover "negative space" of the confetti stars:
This card was made by Demonstrator  Carrie Rhoads. She even used the star sheet as a stencil and sponged coordinating ink colors through the open spaces! See those samples by visiting her website:

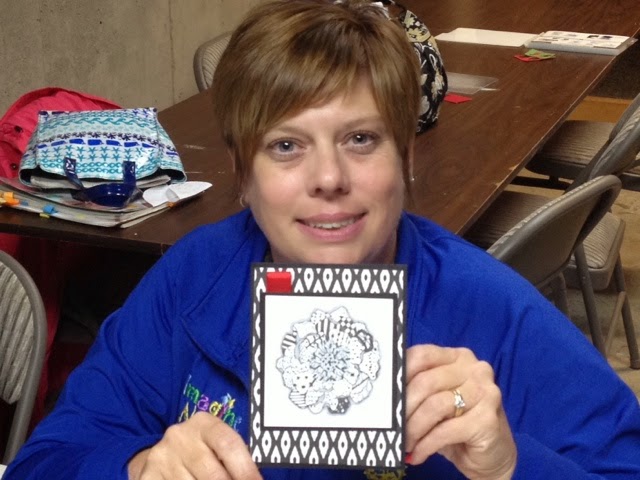
Patty even sent me this picture once she got home:
Look closely, and you will see that she used her extras to embellish the outsides a little more. Also, she cut the star sheet down and added a piece to the inside of each card. LOVE IT!


Besides these nine cards, I know I will get plenty of use for the stamp set that came with the kit:

Can't wait to see what we get next month!

Whatever it may be I'm sure it will be delightful!


Hope you join our little get together!

Monday, December 8, 2014

Second Christmas card punch class!

Besides this week's stamp clubs, this was the last class I offered before Christmas.

Although all final cards were my creations, they were each inspired by photos I found on the Internet: Pinterest, SplitCoaststampers.com, Stamping Up's Stampin' connection, etc.

A "punch class" consists of three cards made primarily of punched shapes. I use punches and sometimes framelits for the Big Shot to get the shapes. There is very little stamping involved.

Class participants follow my model to create three cards. Envelopes are included. Classes are usually "themed" and cost $8 ($10 for the un-assembled "kit to go)".

Here are three last-minute Christmas cards:

#1

Paper: Crisp Cantaloupe, Garden Green, and Whisper White cardstocks. Ornaments and tree shapes punched from the Trim the Tree DSP paper stack (Holiday catalog), Dazzling Diamonds glimmer paper (stars)
Punches: itty-bitty punch pack - Christmas (retired), Confetti Star punch (Holiday catalog)

Ink: Cherry Cobbler
Stamps: Greetings of the Season (retired)
-------
#2


The Confetti Star punch was used once again for this card!

It gets its name from the confetti it produces once it punches out all those little different-sized stars! Makes a bunch, so make sure you have a container handy to store them!

For this card I used some of the confetti from the first two cards to decorate the inside:
But, I also kept some to use as confetti inside the card. 
We all have that one friend that loves to put confetti in their Christmas card, forcing you to knowingly open their card over a trashcan (I'm talking to YOU, Terri S.!) Well, you know what they say about payback....  

Here are the details for the card:

Paper: Elegant Eggplant and Whisper White cardstocks, Silver glimmer paper paper
Punches: 1 3/4" circle, Confetti Star punch
Ink: Elegant Eggplant
Stamps: Bright and Beautiful (Holiday catalog)
Other: 1/8" Silver ribbon


#3


Paper: Chocolate Chip, Baja Breeze,  Riding Hood Red, Blush Blossom, Whisper White cardstocks and retired Christmas DSP
Punches: 3/4" circle, extra-large oval, retired Boho Blossoms and Modern Label punches, Mustache and Wondrous  Wreath framelits


Ink: White gel pen, Pink Pirouhette (for sponging), Old Olive
Other: Frosted Sequin embellishments (Holiday catalog), Brights Candy dots, non-SU emboss folder (a gift from my friend Nancy M & her sister Susan S)


You can always purchase these featured items and more by visiting my online store and clicking on "shop" in the upper right-hand corner.
Don't forget to check out the "Year-end Closeout" sale while you're there!


Sunday, November 30, 2014

Christmas Card 2/5/15 class #2


Here they are!

Five more simple cards for this Christmas!

This class was held on November 21. All who attended made two of each cards, for a total of 10.

Two cards each of five designs for $15. Hence, the class name: "2/5/15"! Envelopes are available as an optional purchase (10/$2) .

I usually hold this class each month
It's PERFECT FOR BEGINNERS as each card is simply designed and can be made quickly.

Subscribe to my email list so you can be notified of upcoming class dates!

Let's take a closer look at each card, shall we?

#1
Stamps: Santa Stache

Ink: Memento Tuxedo black, Cherry Cobbler light Blendabilities marker, ivory flesh-tone Blendabilities marker

Paper: Real Red, Soft Sky, and Whisper White card stock... Dazzling Diamonds glimmer paper... Nordic Noel DSP (Holiday catalog)
Other: Mustache and Banner framelits for the Big Shot
...(envelope stamped with ornaments from Cheerful Christmas stamp set in the Holiday catalog)


#2

Stamps: Visions of Santa (Holiday catalog)
Ink: StazOn black pad, Real Red and Blush Blossom Stampin' Write markers

Paper:  Whisper White

Other: sequins from Frosted Embellishments (Holiday catalog)

...(envelope liner made with Santa and Co. DSP from the Holiday catalog and the Envelope Liner framelits for the Big Shot)


#3

Stamps: Ornamental Pine (Holiday catalog) and Gorgeous Grunge

Ink: Old Olive, Early Espresso, Cherry Cobbler, Whisper White

PaperCrumb Cake and Whisper White

Other: Cherry Cobbler Dazzling Details

#4

Stamps: Gentle Peace (photopolymer) can be viewed online only in the store under "new arrivals"
Ink: Lost Lagoon
Paper: Lost Lagoon, Pear Pizzazz and Whisper White card stock, All is Calm  Specialty DSP (Holiday catalog)

Other: 1/8" Silver ribbon, rhinestone, Dimensionals

#5


Stamps: Autumn Days and Christmas Greetings (both retired)
Ink: Mossy Meadow, Cherry Cobbler Stampin' Write marker, Stampin' Dazzle marker in gold
PaperMossy Meadow, Crumb Cake and Whisper White card stock
Other: Gold Basic Metal Buttons (Holiday catalog)
 

A big THANK YOU my friend Lisa B who loaned Autumn Days and Ornamental Pine to me so I could use them for the class!

Before I had to return them I made some quick cards with the Autumn Days:
I love that you can take the "pepper berry" branch and just keep stamping it in a circle in order to get a wreath!

-----
I featured a lot of items from the Holiday catalog here. This Holiday catalog will run through January 5, so it's not too late to purchase your holiday sets even if they are for next year! 

-------
THERE WILL BE NO 2/5/15 CLASS DURING DECEMBER!

However, please join me in January as I will be showcasing new product from the all-new Occasions catalog and freebies from Sale-a-bration

If you are unable to make it to the class there is always the "to go" option available!

Watch your emails and postings on this blog for further dates and information.

Wednesday, November 26, 2014

My favorite NEW fall recipes!

Because I'm late posting this, chances are you've already done your planning for tomorrow's dinner.

I apologize for that!

BUT if you have these items on hand and can make any of them tomorrow, please do!

Or just make them any day

Winter doesn't officially start until December 21 or so (even though it's snowing outside and looks like winter today!)

Here are my favorite new fall recipes that I've tried this year:


Autumn Squash Soup (Panera copycat recipe)

This would be a great starter to your Thanksgiving feast!

I had the soup at Panera and new I had to make it! I searched the Internet high and low or a copycat recipe. This one nailed it! I found it at:
(Seeves 6)
  • 1 large butternut squash, peeled, seeded and chopped (or 20 oz package precut)
  • 1 tablespoon canola oil
  • salt and pepper to taste
  • 1 15 oz can pumpkin
  • 1 cup vegetable broth
  • 1 cup apple cider
  • 1 cup half and half
  • 1 1/2 tablespoon honey
  • 1/4 teaspoon curry
  • 1/2 teaspoon cinnamon
  • 1 1/2 teaspoons salt
  • 1/4 teaspoon black pepper

Instructions

  1. Heat oven to 450. Toss chopped butternut squash with canola oil and salt and pepper.
  2. Roast for 25 minutes. Let cool 5 minutes.
  3. Using a potato ricer, press squash through ricer. (Or puree in blender if you don’t have a ricer)
  4. In a large food processor, blend pureed squash and pumpkin, pouring vegetable broth, apple cider and half and half through the top while blending.
  5. Pour into sauce pan and heat over medium to a gentle boil. Add honey and spices.
  6. Simmer on low for 10 minutes and serve with roasted pumpkin seeds.
**NOTES: 
     •Too thick? Just add more broth or apple cider!
     •I used yellow curry powder. It was readily available in the spice aisle.
     •Buy pre-cut and peeled squash! (ever try to cut a whole one? I swear, you need a  hatchet!)

------
Creamy Pumpkin-Sausage-Sage Pasta

This recipe I found here:

It is great as a weeknight dinner but also would be great as a Thanksgiving side dish! 

  • 1 pound ground sausage (sage flavor, if available; otherwise use 2 to 3 fresh sage leaves, chopped)
  • 8 oz. mushrooms, sliced
  • 3 garlic cloves, minced
  • 2 cups chicken broth
  • 1 (15oz.) can pumpkin
  • 1 (8 oz.) package cream cheese (regular or reduced fat), cubed
  • 1 cup shredded Swiss cheese
  • Dash ground nutmeg
  • Salt & Pepper to taste
  • 1 lb. pasta (any shape)
Instructions
Bring a large pot of water to boil for pasta.
•Meanwhile, add sausage, mushrooms, and garlic (and sage leaves, if using) to a very large skillet over medium-high heat. Crumble sausage with fork, and cook everything, stirring frequently about 4-6 minutes or until mushrooms are soft and sausage is no longer pink. Drain off excess fat.

•Add chicken broth and pumpkin to pan and stir to combine. 


•Mix in cubes of cream cheese and Swiss cheese and stir to combine until cheese has all melted and mixture is smooth. It might appear chunky for a little while, but keep stirring and it will come together. 


•Add nutmeg, salt, and pepper. Lower heat to keep sauce warm.

•When sauce is just about done, cook pasta according to package directions to al dente. Drain pasta and add to sauce. Stir to combine.

Maybe a garnish of fresh sage leaves?

This was delicious! It tasted like something you would get at a restaurant!

Since I got all ingredients from Aldi, (except the sage, which was still growing outside in my deck container) it was a really inexpensive meal as well! BONUS!
-------


And don't forget my favorite pumpkin dessert creation from this fall - Pumpkin Spice Cheesecake Enchiladas! You can find the recipe here: http://dandyspandy.blogspot.com/2014/10/pumpkin-spice-cheesecake-enchiladas.html?m=1

Enjoy !
Happy Thanksgiving!


Sunday, November 23, 2014

Fall STAMP CLUBS!

My goodness!

It seems as though I have so many pictures on my phone from fall stamp clubs and I haven't blogged about them!

It's time to play catch-up and delete those babies! They are taking up valuable storage space!

I still have early December classes (punch class and packaging class) and clubs, and I know I will be sure to do fun projects there, so I have to do these now!

I won't post everything we did because some are as old as Halloween! But... I'll be sure, though, to share with you things that you can still make like Thanksgiving goodies and Christmas ideas...

-------
SEPTEMBER STAMP CLUB:
Paper: Crumb Cake, Whisper White, Cherry Cobbler and Brushed Gold card stocks, Typeset specialty DSP

Stamp set:  Bright and Beautiful (Holiday catalog)

Ink: VersaMark 
Other: Star framelits for Big Shot, gold baker's twine, gold and white emboss powders , rhinestones, Cherry Cobbler Blenabilities marker 


OCTOBER STAMP CLUB:

This months meeting was fun because I was able to enhance our learning experience by using a projector! By doing so we were able to watch a video about the "Zentangle" process (see card below), and also view several samples of projects using our featured stamp club sets!

After watching a great video by "Understand Blue" http://youtu.be/KYAGeSeGZww . Here's the card I created:
Here is a close-up:

Stamps: Blended Bloom, Petite Pairs
Paper: Basic Black and Whisper White cardstock, Back to Black DSP

The beauty of this project was that no two people have the same doodles within their Blended Bloom flower! 


Here is Pam A. showing her creation:
.... And Lisa B. (being "photo-bombed" by Patty D.!

We found that the journal pensfor Project Life by Stampin' Up! were perfect for this project!
--------
By far, my favorite project of this whole season was the "caramel apple"!

This was a case of a project I originally viewed on Pinterest!

It is made with the Curvy Keepsakes Box thinlits for Big Shot, and filled with caramel candies.


The apple and leaf come from the Fun Fall framelit set, also in the Holiday catalog.  The apple is actually a circle tag! We just hand cut a curve in the bottom of it so it resembled an apple.


Finishing touches were a doily, black baker's twine, a banner greeting and a fun straw/stick leftover from the June My Paper Pumpkin patriotic pinwheels kit!

NOVEMBER STAMP CLUB:

This month my catalog coupon is for a free pack of gift card enclosure envelopes when you purchase any kit. 


Of course they are made to hold the ever-popular gift card, but I wanted to show you something else you could do with them:
By scoring 1/2 inch away from three of the creases, we were  able to fold it into a dimensional, small pouch! We decorated it with a belly band made of the Nordic Noel DSP and a tag featuring the Santa Stash stamp set (with matching mustache framelit).
Embellishments on this project included Real Red cotton ribbon and the new Frosted Sequins (shown in the Holiday catalog)
------
We made this cute little box tote:

Is made by gluing two of the Tiny Treat Boxes together (with lids open)!
To decorate we used:  the convenient Under the Tree Tag a Bag accessory kit, Santa & Co. DSP, Visions of Santa stamps (and on mine) the 12 Days of Christmas stamp set(Holiday SUPPLEMENT).
------
Last but not least, we prayed with my many Merry Stars kit from the holiday SUPPLEMENT.
Holy smokes! You get so much stuff in this kit!
Each club member was invited to choose a star of their choice to create. We had fun using various embellishments that came with the kit!

Here are some of our creations:


Stampin' Up! also gives other creative uses for the kit:
Small stars used as place settings...
A lighted garland....
Tree-shaped stacked boxes....
I could go on! I am sure you can use your imagination (or search Pinterest!) for ideas to use the kit contents to create cards, lidded boxes etc.

Have fun!

We did!
------

We are always having fun as we create what are Stampin' Up! product!

For more information about stamp clubs or to purchase any of the SU! products please contact me!

Email: Dandyspandy@sbcglobal.net