Monday, October 27, 2014

Pumpkin Spice Cheesecake Enchiladas (with caramel drizzle)


Oh.... my.... Gee....
These were great!

So... fall has officially been welcomed in all of its capacities here at the George house... Cooler weather means that the heat has been turned on despite my husband's protests, endless falling leaves from the woods cover the long driveway and yard in hopes of someday maybe being raked, my Longaberger Fall Foliage dishes have replaced the red, white, and blue "summer" dishes (don't judge), and all sorts of  "fall-flavored" food and drinks are being prepared.

I do like some pumpkin flavored foods and drinks, but I'm not one of those people that have to have everything pumpkin-flavored come fall. I like to bake with a lot of apples at this time of year too...  squash... just baked goods, in general, I guess, and warm comfort foods. 

Fall is, after all, "sweater weather".... So, maybe my "sweaters" are made of extra pounds? I'll have to watch that...

Anyhoo, this recipe IS for the pumpkin lovers out there!

Sooo easy! Sooo delicious!


Pumpkin Spice Cheesecake Enchiladas

Yield: 9-12 servings

1 pkg.  (8 oz.) cream cheese, softened
1 cup  canned pumpkin
1/2 cup  sugar
1/2 tsp.  pumpkin pie spice
2½ cups Cool Whip, thawed
18-24 Flour tortillas
6 tbsp. butter, melted
2 tsp. sugar
2 tsp. cinnamon
Caramel sauce

In a large bowl, beat the cream cheese, pumpkin, sugar and pumpkin pie spice with electric mixer on medium speed until well blended. Gently stir in the whipped topping. 

**Divide the cream cheese mixture evenly between the tortillas. Roll each tortilla up and put on serving plates. In a small bowl, combine the butter, sugar and cinnamon. Brush the mixture over the over the rolled tortillas. Top with caramel sauce. 


** (this is the exact recipe that I found on Pinterest.  It comes from the website  http://www.lovebakesgoodcakes.com/2013/10/pumpkin-spice-cheesecake-burritos-with.html?m=1

The only thing I changed is this:

Before filling tortillas: brush each tortilla with melted butter, cinnamon and sugar mixture. Place in a hot frying pan and cook, maybe, 30 seconds on each side.
Frying the tortillas first before filling makes them a little more firm, so they are not flopping around when you fill them or try to eat them. (an old Spanish teacher trick!)
YUM!

There you have it!

A no-bake, fancy-looking dessert for fall that every one will love!

You're welcome.
Saturday, October 25, 2014

Christmas card 2/5/15 class

Today I'm trying to catch up on blog posting! I admit I have been remiss. I just looked at the last post date of 10/10 - holy cow! Two weeks have passed since I've posted  anything!

Of course, a lot has happened since then! I have had a 2/5/15 class and October stamp clubs. I have cooked many a delicious meal - I just haven't gotten around to sharing them yet.

So, this week I will more than likely bombard you with blog posts, since I have no stamp classes to prepare for this week!

Oh well, that's how it goes sometimes, I guess! LIFE HAPPENS. (really, it's just that hockey season for my younger son has begun...)

We will start with stamping... One of my favorite things!

Christmas Card 2/5/15 Class

I originally posted this picture of the first three cards: 

So, we'll take a look at those first and then the other two that I added after this picture was taken...

Card stock: Lost Lagoon, Whisper White, Soft Suede, Pear Pizazz
Ink: Lost Lagoon, Soft Suede, Pear Pizazz
Stamps: Cheerful Tags (Holiday catalog)

Other: Lost Lagoon ribbon, staple, rhinestones, Note Tag punch (Holiday catalog)


Card #2
Card stock: Whisper White
Ink: Basic Black, Crumb Cake
Stamps: Endless Wishes (Holiday catalog) 


...and the ever versatile Gorgeous Grunge
Other: linen thread, pearls, vintage faceted buttons
And strips of DSP: Modern Medley (retired) and Back to Black.
(Those of you who have received catalog coupons from me can get this Designer Series Paper at 1/2 off during the month of October! You will see it again in the October stamp club post!)


Card #3
Card stock:  Whisper White,  Island Indigo, MetallicSsilver
Ink: Garden Green, Island Indigo
Stamps: Festival of Trees with matching punch (Holiday catalog)


Other: Island Indigo baker's twine, star (from Itty-Bitty Accents punch pack), Polkadot embossing folder for Big Shot)


Card #4

Card stock: Cherry Cobbler, Whisper White
Ink: Certainly Celery (retired), Wild Wasabi 
Stamps: Wondrous Wreath and matching framelits (Holiday catalog)

Other: rhinestones, Filigree Frame embossing folder for Big Shot


Card #5

A ready-made card from a "My Paper Pumpkin" kit!


Love these kits! Everything is cut for you, pre-scored, and planned out! All we really had to do on this card was stamp the greeting in Real Red ink. Even the little, stitched star banner was done for us! The original star banners were each 20 inches long!  I trimmed them down to just fit a card, and now I have lots of star banners to decorate packages at Christmas time!

To purchase any of the products spotlighted here please visit my website:
If you are interested in receiving a monthly subscription to "My Paper Pumpkin",  please visit the website at:

I would be grateful if you chose me as your demonstrator!


Friday, October 10, 2014

The punchcard that didn't make the class...

I saw a similar card on Pinterest and had to try it! 

It is a beauty!

My intention was to create it for the fall punch class.

Believe me when I say, those of you who attended the class would have killed me if we made this!

There were so many tiny pieces... This card is definitely a "one timer" - going to someone very "card worthy"!

I have to hand it to Alexandra Bleicher over at http://alexscreativecorner.blogspot.com/2014/05/apple-of-my-eye.html?m=1
She originally created this apple basket - she obviously has the patience of a saint - and her punch art is spectacular!


The basket was made with the Decorative Label punch - just trimmed a bit. 

The basket handle was made with the Modern Label punch cut in half.  


Those pieces were sent through the Big Shot with an embossing folder, and then sponged.

Making the apples is the tedious part.

Each apple is made from one of the petals on the Pansy punch.


The brown apple stems are actually brown cherry stems, punched from the Cupcake Builder punch glued behind each apple. (Ay, ay, ay!)

The tiny leaves also come from the Cupcake Builder punch. They are candle flames, believe it or not!


Cute, cute, cute!

BUT, unless I had several pairs of tweezers and magnifying glasses for everyone, this card wasn't happening at punch class!

I wanted to share it with you anyway so that you can make one of your own!

JUST ONE!
Hahahaha
 (Just don't blame me when you go cross-eyed!)

Thursday, October 9, 2014

Fall Punch Class - details

I love cards made with punches!

Let me rephrase that... I love cards that other people make with punches!

I save them to my computer and then I copy them. Sometimes I tweak them a little to make them more of my own.

But I am simply IN AWE of people who can look at shapes and create such magnificent designs with them! I can honestly say I've never looked at the Curly Label punch (for example) and thought "Hey, I know... I can make a scarecrow out of this!" I just don't see it.

To punch-art creators everywhere -- I salute you! BRILLIANT!

I had these three cards pinned to my "stamping - punch cards" board on Pinterest (although I have to give a "shout out" to my friend, Lisa B, who actually made the turkey before I did, and then I copied hers!

Let's take a closer look at each... shall we?

Card stock: Cajun Craze, Very Vanilla, Perfect Plum (cut with the Deco Label framelits), 

Crushed Curry (cut with a circle framelit) and for the turkey: Chocolate Chip, Cajun Craze, Tempting Turquoise, Pumpkin Pie and Old Olive (in a piece of retired DSP)
Inks: Cajun Craze, Crushed Curry, Early Espresso
Stamps: Good Greetings (free set for $300 hostesses September through October!) 

and leaves from Days of Gratitude (Holiday catalog)
This is the set that we will use to complete the Gratitude for Days BANNER. (I am having that class Monday, October 27.)

Punches: scallop circle (1 3/4"), 1" circle, Word Window, heart from Owl punch (used for feet and gobbler!)

Other: Googly eyes
-----
This cutie also uses the googly eyes!
Card stock: Hello Honey, Early Espresso, and Very Vanilla (cut with the Top Note die for the Big Shot), 

Crumb Cake and a piece of Sweater Weather DSP (retired) for the hat, Pumpkin Pie  
Ink: Early Espesso
Stamp: For All Things (Holiday catalog)
Punches: Curly Label, Itty Bitty punch pack (flower)

Other: Candy dots, burlap ribbon, Googly eyes, brushed bronze button

Note: Our 1 1/4" Burlap ribbon is easily frayed! Several short pieces are adhered with liquid glue to make the scarecrow's hair. A long piece was threaded through the metallic button before adhering it to the card with glue dots.

-----
Our third card is the classic "pumpkin made from circle/ovals". We did a card like this in the past, but of course, different stamps were used - therefore a different card was made!


The nice thing about pumpkins is that, nature, there are no two the same. That lends itself to some flexibility when you're making them out of punches. Your pumpkin is the result of how you lay and/ or overlap the circles/ovals. Even this time I had someone who, instead of creating a large fat pumpkin, they created a taller, skinnier one. It was great!

Card stock: Old Olive, Confetti White
(for pumpkins: Pumpkin Pie and Crumb Cake)
Ink: Old Olive, Pumpkin Pie and Cajun Craze
Stamps: Flowering Flourishes, Thankful For... (retired), and "you" from Endless Birthday Wishes


Punches: small oval,  1" circle, large oval, 1 3/8" circle
Other: sponge daubers

Note: for the "vines", to be able to get two colors on the image, you CAN use markers. But it was easier for us to ink the whole stamp in Old Olive, especially because I had placed both "vine" stamps on one clear block. Then, using a blender pen, we removed the green ink from the flowers. Using the Pumpkin Pie marker, we then colored the flowers before stamping!
-----
Like the October 2/5/15 class shows I'm ready to switch gears in my stamping and get ready for Christmas!

So, even though I haven't set a date yet, November and December  punch classes will both feature Christmas cards!

Which ones will I choose? Hmmmm.... There are so many fantastic ones out there!

Guess you'll just have to wait and see! 😉

Saturday, October 4, 2014

WCMD update!

Thanks to everyone who attended my free Christmas Card "World Cardmaking Day" event! 

I hope you had fun! I know I did!

Today my guests got to play with some of the merchandise from the Holiday catalog: New stamp sets, framelits, and embossing folders!

I thought I would finally share a little detail about the three cards we made today.

The quickest-made card of the bunch seems to be getting the most likes on my Facebook post! It was quite popular at the class too! It's easy and fast to do and it is absolutely gorgeous!


Cardstock: Very Vanilla
Stamps: Cheerful Christmas (Holiday catalog)

Ink: gold Encore pad
Other: Filigree Frame emboss folder for Big Shot (Holiday catalog),

gold emboss powder, rhinestones colored with the Cherry Cobbler (dark) Blendabilities marker
--------
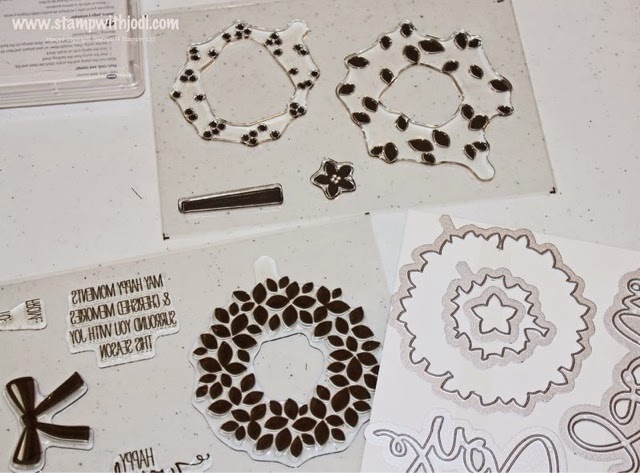
This card features the new stamp set Wondrous Wreath and the matching framelits, that you can purchase as a bundle


SUGGESTION: Anytime you are offered a bundle, I would purchase it! You save money by buying both the stamp set and the framelits together, and it will save you from "fussy cutting" everything out!

This is a "two-step" stamp set. You stamp the main image in two different colors to get more of the dimensional appearance. In this case, it is the wreath that is stamped in two different colors.

What's different about this set is that both the stamps and the framelits have a little "reference tab" to which I lovingly refer to as the "paddle". Thank goodness it has it! -  It takes the guess work out of lining the images up, especially when you cut them out with the Big Shot. (Don't we wish that we can have that for all of our sets like Flower Shoppe and Flower Patch... Oh well! Better late than never!)

I found this picture on Google, so that you can see the little tabs on the stamps and the metal pieces. See them? I told everyone to point the tabs (AKA "the paddles") towards themselves when they  stamped each time. Then, use a pen to make a dot or a "B" (for "bottom") on your scrap paper. That way, when you go to the Big Shot, you can easily line up the "paddle" of the framelit in the same direction that you did your stamp!
Cardstock: Garden Green, Baked Brown Sugar (on sample, but they used Sahara Sand at class!) and Whisper White.
Ink: Wild Wasabi, Garden Green, Cherry Cobbler and Baked Brown Sugar (with Hardwood stamp for background piece)

Other: Trim the Tree DSP paper stack (Holiday catalog; shown below), rhinestones and Dimensionals.
-----------
The third card had many steps, but the end result was worth it!


It was not difficult, it was just that there were so many different things to do!

Nevertheless, it was an awesome card!


THIS IS MY FAVORITE NEW SET FROM THE HOLIDAY CATALOG!!!!!

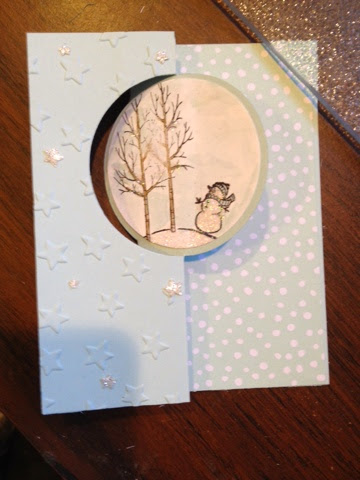
It is called White Christmas. It is only sold as a photopolymer set, and thank goodness(!) , because you need perfect placement for some of the elements. With clear photopolymer stamps you are able to do that very easily!


Cardstock: Soft Sky and Whisper White
Ink: black StazOn and Soft Sky (for water colored sky), markers in: Lost Lagoon, Sahara Sand, Tangelo Twist and Baked Brown Sugar
Other: Circle Thinlet die (makes flip card), 

Lucky Stars emboss folder for the Big Shot, 

2 1/2" circle punch, Aqua Painter, 2-Way glue pen, Dazzling Diamonds glitter, Confetti Star Punch (Holiday catalog)
And paper from the new Specialty DSP All is Calm.
 
-----
I was thrilled that everyone seemed pleased with their cards! I'm sure their "card-worthy" recipients (haha) will be just as impressed with them as we were!

THANKS TO PINTEREST FOR THE "PIN-SPIRATION"!

You can always view these items online and make your purchase by visiting the Online Store. Just go to my website, following the link below, and click "shop" in the upper right-hand corner.

While you are there, don't forget to check out the promotion that Stampin' Up! has going on right now!

It's called Stamp, Stock and Save!


It only runs until October 6, which is Monday, so you have to act quickly!

Ink pads, cardstock, a few stamps sets, envelopes and an adhesive are all marked down during this short but fantastic promotion!
-----

We will add to our Christmas card collection at the next 2/5/15 class.

Mark the date - Friday, October 17 at 4 PM! 

Make five different Christmas card designs (two of each card) for only $15!

RSVP by Wednesday, 10/15 please.

You will need to bring adhesive to this class.

I will post pictures for the class as soon as I have the samples ready!

Happy stamping!