Tuesday, May 13, 2014

Friday stamp club does their own thing!

Like I said in my post last week, I wasn't feeling quite up to par, so I didn't prepare anything for Tuesday night stamp club. They decided on the projects they wanted to make and we made them! 

They chose this card from my Owl punch class,
and this was the card they chose after browsing my Pinterest boards:
We had so much fun!

I had another club that met on Friday morning. I decided that I would do the same thing for them.

So, they looked at my Pinterest boards and had some stamp sets already in mind that they had wanted to play with....

And here's what they decided upon:
Card number one-everything Mosaic!

Mosaic Madness stamp set and the Mosaic embossing folder for the Big Shot. We added some DSP (Quatrafancy) and rhinestones for bling!
The colors chosen were Tempting Turquoise, Melon Mambo and Daffodil  Delight.

Some of them liked the DSP so much that they bought it, and I was happy that it was still available even though it's on the retiring list of accessories! If they didn't have the stamps or the emboss folder, they ended up buying one or the other.

Funny, same thing happened with the Tuesday night club. A few of them bought the Owl punch (we used for the baby clotheslined card) and a few of them bought the Mixed Bunch stamp set and or the Blossom punch.

I wish I had that red "That was easy" button from Staples! 

Just goes to show, whenever we think we have everything we want...  there's always more!

Wait until you see the new catalog! You'll love it and want everything in that too!

It's a sickness, I tell ya!

"Stampin' Up!-itis"....

Anyway, before I get too much off the track... here's card number two- I love it!
Darling! That's an adjective that comes to mind!

We cut out a dress in Calypso Coral card stock using the Dress-Up framelits. The bottom of the dress was run through the Big Shot with the Delicate Designs emboss folder.

The white card stock panel was also run through the Big Shot with the Needlepoint emboss folder. A white flower was punched out using the Itty Bitty punch pack, and a rhinestone was added to the center.

The cutest thing about this card is that little hanger!

Big thank you to Ronnie, who made all of the hangers for us, using paperclips!

This tutorial comes from www.instructables.com

•Start to separate a paperclip:

•Separate it and bend it enough so that one and meets the other...

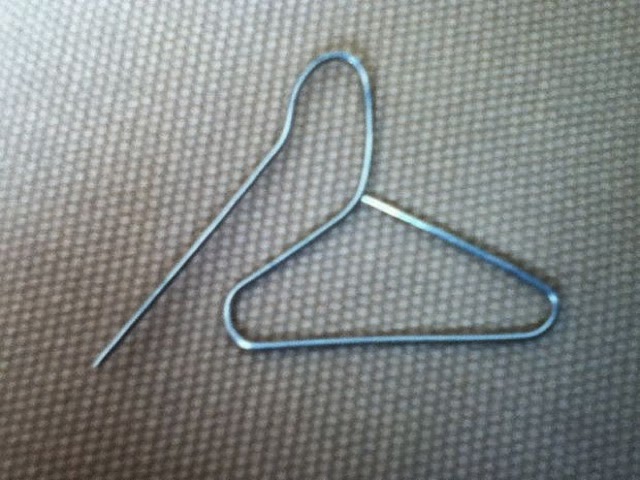
•Cut off the long piece using wirecutters:
And there you have it!

For next month's stamp club I will be prepared! I already know what I'm using-  product from the brand new Stampin' Up! catalog! (Focus on Blendabilities alcohol markers!)

I can't wait to share with you and I will be sure to do so!

Wednesday, May 7, 2014

Stamp club runs amok!


Just kidding, they were quite controlled...

What really happened was that I wasn't ready for stamp club. I haven't been feeling up to par lately and we had our date set. I didn't want to reschedule because products are running out quickly on the retired list - I don't want to be the cause of someone missing out on something they really want!

Of course I was so stressed out about this!

It's like when I used to have that nightmare the night before the first day of school every year - you know the one - where I wasn't prepared for teaching the class?

 Enter my logical and ever supportive husband.... "Just relax", he said. "You'll be able to get ready in time."

Well, you know what? For once I took his advice! I relaxed and didn't get stressed out!

In fact, you know what I did?

I texted them early in the day telling them that I had nothing ready... But if they wanted to look at my Pinterest boards and email me an idea... that would be great. We would do whatever they wanted and it would just be a "ladies stamping night" - fun!

We ended up doing one of the cards from my owl punch class - the baby clothes on the clothes line - because they liked that.

Then, one of the girls pulled up a card on the Internet that they all liked and they made that!

Here it is:
Isn't it great?

It features the Mixed Bunch stamp set and the Blossom punch. The colors used or Gumball Green (which we are all sad to see retire) and Calypso Coral. 

First a "blossom" was punched out of a Whisper White postcard. Next, a piece of Calypso Coral DSP was placed behind the punched-out area.

After stamping, they ran it through the Big Shot with the polkadot embossing folder, and embellished it with a ribbon, small punches, and a brad.

I think it's a great card and they all loved it!

Although I promise not to make a habit out of not being ready, this was great fun!

Thank you, Lisa, for doing the prep work for the card and to my fabulous stamp club just for being YOU!


Monday, May 5, 2014

What's cookin'? - it's cinco de mayo!


It is May 5 - or, el cinco de mayo in Spanish.

That is how you say the date. And no, the month is not supposed to be capitalized like in English!

It is an important date in Mexican history, but no, it is not Mexican Independence Day! (That is September 16.)

As a Spanish teacher it is my duty to give you a quick history lesson... Back in 1861 the French, under the rule of Napoleon III, came to Mexico to collect debts. When Mexico couldn't pay they sent Maximillian and established a monarchy, occupying the country. The Mexicans fought French troops, and celebrated an unlikely victory in the town of Puebla, on May 5, 1862. This date remembers that victory and is celebrated throughout the country as well as parts of the United States. 

There you have it in a nutshell - the meaning of cinco de mayo. 

You're welcome.
Many Americans, not affected in any way by Mexican heritage, just see it as another opportunity to have Mexican food and down some margaritas!
Okay, I'm down with that. 

As I have grown older I have come to the realization that not everybody studies Spanish or finds Mexican culture as fascinating as I do.

I forgive you.

Anyhoo, so as I do every year, I have to make Mexican food for dinner. 

This year I made Chipotle Chicken Black Bean Soup otherwise known as Mexican "stoup".  I featured this on my blog before. I hope you will check it ou!t it is listed under the date: Jan. 27.
Of course, I also made a dessert!

I made Mexican Chocolate Sopapilla Cheesecake!

Is this an authentic Mexican dessert?

No, not really.

Although, it does incorporate two authentic Mexican flavors - Mexican chocolate and sopapillas.

If you have ever experienced Mexican hot chocolate (for dipping churros) you know that it has a somewhat spicy flavor. The chocolate in this dessert mimics that with a pinch of cinnamon and a pinch of cayenne pepper, both added to the chocolate.

A sopapilla is a  common Mexican dessert. It is a flaky, lightly fried, "pillowy" pastry sprinkled with cinnamon and sugar. It is often served with honey for drizzling.
Sooooo.... These  components are American-ized into this wonderful dessert!


The chocolate is spiced up and added to a cheesecake mix. The pastry part comes from Pillsbury crescent dough!

Ingredients

  • 2 cans Pillsbury crescent rolls
  • 2 packages (8 ounces) cream cheese, softened
  • 1 cup sugar
  • 1 teaspoon vanilla
  • 1/2 cup semi-sweet chocolate chips, melted
  • 1/8 teaspoon cayenne pepper
  • 1/2 teaspoon cinnamon
  • Topping
  • 1 tablespoon cinnamon
  • 1/4 cup sugar
  • 1/4 cup butter, melted

Instructions

  1. Preheat the oven to 350 degrees.
  2. Unroll one can of the crescent roll cans and spread the whole sheet on the bottom of an ungreased 9x13 pan.
  3. In a medium sized bowl, mix the cream cheese, sugar, and vanilla together until combined.
  4. In a separate bowl melt the chocolate chips according to the package directions. Then stir in the cayenne pepper and the 1/2 teaspoon cinnamon. Add to the cream cheese mixture and mix until combined.
  5. Spread the cheesecake mixture on top of the crescent roll.
  6. Unroll the remaining crescent roll and spread the whole sheet on top of the cheesecake layer.
  7. Spread the melted butter on top of the crescent roll layer and sprinkle with the combined cinnamon sugar mixture.
  8. Bake for 20-30 minutes or until the crescent is golden brown.

    What's cookin'? - "Crack" Cake

    This past Friday night I followed the recipe that I had found on Pinterest. It was for "Crack" Cake.

    No! There are no illegal substances used in this cake! My husband wouldn't allow that ,now would he?

    But the name implies that it is addicting like crack!

    Let me just say that I made this cake in the evening on Friday. By noon on Saturday it was gone.

    One family of four devoured the "crack" cake. I'm embarrassed.

    I am glad I didn't witness them sneaking to eat it or having the shakes or anything....

    Seriously though, this cake was easy to make! It will be a hit when ever you choose to serve it!

    For the cake:

    • 1 box yellow cake mix 
    • 1/4 cup brown sugar
    • 1/4 cup white sugar
    • 1 box instant vanilla pudding mix
    • 2 teaspoons cinnamon
    • 4 eggs
    • 3/4 cup water
    • 3/4 cup oil
    • 1/2 cup white wine (ANY kind; "real" or "cooking" wine)

    For the glaze:

    • 1 stick butter
    • 1 cup white sugar
    • ¼ cup white wine 
    ** Let me just say right here- you cannot taste the wine in the finished product! (For some that may be a bad thing - LOL - on the other hand, for me it was a good thing! )

    ----
    •Mix all cake ingredients together.
    •Pour into a greased bunt pan. (That's what I used, but I'm sure you could use another kind of pan.)
    •Bake on 350° for one hour (or until toothpick inserted in the middle comes out clean)

    •Mix ingredients together for the glaze.

    •While cake is still hot pour on the glaze.
    Yes! it's a lot!

    •Let cool completely.
    •Loosen sides of cake from Bundt pan as much as possible (trust me on this one! - This is why you see a picture of the finished cake that came from the Internet! But, I guess in the long run, it didn't matter what it looked like!)

    •Flip onto serving plate.

    •Take a picture of it because it won't last long! Hahaha

    Owl punch class...


    Last week I posted the "minion" card which we made at the owl punch class last Wednesday night.

    And, holy smokes! I forgot to post the other two!

    Well, here they are now. Better late than never, I guess!

    I decided that this class would make three cards with the owl punch, but none of them would be owls! We will have another class in the future with the owls themselves, I promise! 

    Believe it or not, these two cards were also made with the owl punch, just like the "minion":

    Here is the owl punch itself:
    Now, look closely at all of the pieces you get from just one punch... You can do so much with them! 

    When working with the very small pieces of the sponge I highly recommend that you have a pair of tweezers on hand (and your bifocals!).

    Also use a glue with a pointy tip such as the Tombow multipurpose glue. 
    Don't try to use your SNAIL tape - it's too wide and you'll make a mess!

    For the first card, we used only the piece that I'd like to call the "vest".

    It is so cute when it is transformed into baby clothes hanging on a clothesline!

    For little-girl dresses you just simply add a piece of the ruffled trim ribbon with sticky strip.

    For boys' overalls, you have to cut an upside down "v" the in the bottom of the vest so that you make pants legs.

    Scraps of paper work used to make straps. Tiny pearls were added, along with the heart, from the owl punch, on the overalls.
    How stinkin' cute is that?
    -----
    To make the second card, I showed class participants two different ways that I found on the Internet to make tulips.
    Both use the main owl "body".
    To make the one on the left you use one owl "body" and then one petal from the Build a Blossom punch (retired). Sponge all edges before gluing down!

    That was easy! But you don't have that retired punch - what do you do?

    The tulip on the right was made with two owl "bodies". Starting at each of his "ears",  you cut one body into two pieces. Sponge all pieces. Overlap the two that you have cut and glue together. Attach those to the uncut owl body with a dimensional.
    This stems are just scraps of green card stock. 

    The leaves are also made with the owl "body". Just cut it like you did for the tulip   on the right!

    And there you have it! The three cards that we made at the owl punch class - but not an owl in sight!


    Thursday, May 1, 2014

    TbT- You've come a long way, baby!

     
    This was one of the first cards I made after my stroke. I had the stroke at the end of November 2012 and I held stamp club again in February as a way of motivating myself and seeing my friends.

    I remember showing them this card and showing a nicer one on my laptop saying, "Here is what it is supposed to look like...!"

    Mine was so crooked due to my right hand tremor.. Look at the bike from the Feeling Sentimental set... It looks as though it's on a bumpy road instead of a nice level path! LOL

    Well, this card is in my stamp room and it serves as a reminder of just how far along I have come in a year and half.

    It also reminds me that I have such special people in my life!

    Friends who have stuck by me through thick and thin.

    Friends who didn't care that my card was sub-par(!). They just came to see me.

    I am so blessed and this card reminds me just how much!

    Wednesday, April 30, 2014

    Owl Punch Class-minion!

    Are you familiar with adorable, hilarious "minions" from the Despicable Me movies?


    Are you familiar with Pharrel's "Happy" song from the second movie?

    If you're not, check it out by following this link to YouTube - it will surely make you HAPPY...
    http://youtu.be/Q-GLuydiMe4

     Because it is so popular I decided I would make it part of our Owl Punch Class.

    Here's the minion I made:
    This body is made from the Owl Punch, minus the ears, punched out of Daffodil Delight card stock. He has black Owl feet and then another pair for hands - I added the arms just from scraps. His overalls were punched out of Pacific Point card stock - this is just the Owl "vest".

    I gave him googlie eyes and hair, along with goggles, made from scraps and circle punches from the Owl.

    Here's the finished card:
    How appropriate this greeting is, especially based on the popularity of the song!

    There are so many things you can do with Owl punch! Just be patient and have a pair of tweezers (!), as there are many little pieces to work with!


    I'll be sure to share the other cards we are making with you soon!