Wednesday, June 18, 2014

June stamp club - new In Colors

Every month, once a month, 3-5 women gather in my home for Stamp Club. Their obligation is to purchase $30 (or $50 if they are in the summer club) of catalog merchandise each month. In doing so, I can submit at least a $150 show from each club, therefore garnering hostess benefits! One month each participant get a turn at collecting the free hostess benefits, because each club will meet for as many months as there are participants.

We always have fun!

Stamp Club is something that I have done for years. It is a great way for me to keep my little business up and running especially since I no longer do home workshops.

For you:
•It is a way to whittle away at your wish list.
•It is a way to learn how to use new product (or different ways to use that which you've already bought!)
•It is a  monthly gathering of women (so you know it's fun!), many of them form friendships that last a lifetime all because they met at a Stamp Club!

I always try to teach something different - a new fold or technique - each month. I also try to introduce new product, especially if it's seasonal. 

Stampin' Up! is always offering something new! Clubs are a way we can talk about all the specials that are going on.

If you're local and interested in joining a Club, please just send me an email and I will add you to a list. When I get five participants (or three for the Summer Club) I will let you know. At that time we can discuss which times/days work best for all of you.

Here are a few projects from past Stamp Clubs:
I have often entertained the idea of a long-distance club. 

Even though I have lived in Connecticut now for 10 years, I still have customers in Pennsylvania and elsewhere. (now that's what I called loyalty!)

I could send all the materials pre-cut and pre-stamped ahead of time. Then you could view a private video on YouTube to assemble.

As of yet I have not done that, but if you're interested, perhaps I just need a little prodding....

Last night, the first of my three June Clubs met. I have three projects planned this month. Each will receive its own blog post, so be sure to check all three out! 
--------
At this month's Stamp Clubs, my first objective is to introduce the five new In Colors that Stampin' Up! is offering. They will be available for two years.

 The first card we made was really just to showcase the colors: Blackberry Bliss, Mossy Meadow, Lost Lagoon, Tangelo Twist, and Hello Honey.

We used the new Work of Art stamp set.

I love this set - there is so much you can do with it! I'm sure you will be seeing lots of it in future posts from me!

We embellished the card with some rhinestones on a Lost Lagoon butterfly. It was punched out using the Elegant Butterfly punch, and adhered with mini glue dots.

(Note for future: I originally did the colors in reverse order; when I stamped the sentiment, the Blackberry Bliss ink was too dark to really see the black ink.)

Here is a close-up of each of the colors and how they compare to our existing colors...

Blackberry Bliss:

Blackberry is on the top, to the right, with the ink pad. Under that, going right to left, are the current colors of Rich Razzleberry, Elegant Eggplant, Wisteria Wonder and Perfect Plum. I've also included the retired Concord Crush (because purple is my favorite color!)

Next up - Mossy Meadow:
Again, the new color is on top, with the matching ink pad. Going right to left you have: Peaf Pizzazz, Wild Wasabi, Old Olive, Always Artichoke, Garden Green, Pistachio Pudding, and my beloved Gumball Green, now retired.

Let's look at some of the blues compared to the new Lost Lagoon...

No  retired colors in this one! Starting with the new on the right and going to the left you'll see: Marina Mist, Island Indigo, Pacific Point, Bermuda Bay, Coastal Cabana, and Pool Party. 

Who has a pool? I feel like going swimming now!

With that in mind, let's look at our "sunshiney" colors of orange, starting with the new Tangelo Twist on the right:
After the new color you will see Tangerine Tango, Pumpkin Pie, Crisp Cantaloupe, Cajun Craze, and the retired Dusty Durango (because I still have some!)

Last but not least we have the yellows. Let's see how they compare to the new Hello Honey (on the right):
From right to left: Hello Honey, Dafodill Delight, Crushed Curry, So Saffron, retired InColor Summer Starfruit, and retired old favorite More Mustard.

I hope it helps you to see similar colors side-by-side. I thought initially that many of them were very similar to something else we already have. But, when I do this I see very clearly that they are different!

These colors will be around for two catalog years, so they are labeled as "In Colors 2014-2016".

In the catalog you will find  In Color card stock, markers, ink pads and refills, and even fun embellishments!

If you received your catalog from me directly you have also received a coupon good for this month for In Color products! Now is the time to stock up!

So, have fun playing and creating with the new In Colors!

Friday, June 13, 2014

Blendabilities Markers!


As you probably all know by now, we have a new catalog that was effective starting June 1. One of the hot-ticket items for the year is going to be the new Blendabilities markers! Even though they're not going to be available for purchase until August, they allowed demonstrators to pre-order them now in the six colors available, so we could start playing with them in order to teach you how to use them.

Blendabilities are alcohol-based markers, much like another very popular brand!

You can combine colors and blend out the lines where the colors meet making your coloring look oh-so-natural! There is even a special pen called a Color Lifter that "pushes" the color - you can see where I used it on my flower - the areas are lighter.

Stampin' Up! has come out with an effective, yet inexpensive, way to market them.

We are selling three shades of a certain color )light, medium, and dark) as a set for only $11.95!  There also is a larger set of skin tone colors that will sell for $22.95.

The Blendabilities markers will be available to customers in August. Stampin' Up! is anticipating their popularity and they are allowing this time to overstock their inventory.

Until then I can continue to play and show you what I make with them! (And get better at using them!)

I started with the new Blended Bloom stamp, and the pack of Pumpkin Pie Blendabilities, as well as the 3-pack of Daffodil Delight.
I will be demonstrating how to use the markers at summer stamp clubs. Stamp club participants will also have a chance to play with them before they become available in August.

One thing I really like is, that you can use the Blendabilities to add color to your rhinestones and pearls, because they are out alcohol-based!

It is recommended that you stamp in the new Memento Tuxedo Black ink pad on Whisper White card stock. You will have to cut your image out (or layer your main piece), as the colors do run through the paper.

After I cut my flower out I decided that I wanted to add brown to the center. I used the Bronze and Mocha, the two darkest brown shades, from the skin tone assortment. I colored the center of the flower (no blending) and also the rhinestones.
I decided to make a card for my mother. She helped me so much last week when she was here for my son's graduation party! She always loves my cards, and I know she will be impressed with this one, because she saw just the Blended Bloom sitting on my stamp room desk, unfinished.

The card base is Very Vanilla with a layer of the new In Color Hello Honey and Early Espresso. I stamped in the gold Encore ink with the Dictionary background stamp. The sentiment is from Delightful Dozen (now retired). I finished it off with new ribbon in Tangelo Twist.

Thursday, June 12, 2014

What's cookin'? - "Lady sings the bleus"

I love bleu cheese.

For some it is an acquired taste, I know.

But even if you think you don't like it, I'm going to suggest that you read this post. There's bound to be something in it that you will like, and eventually become a blue cheese lover like myself!

We often buy a big hunk of Gorgonzola cheese. 

What's so special about Gorgonzola?

Actually, I don't know!

I do know that it is a type of bleu cheese... I know that it originally comes from a special place in Italy.... I know that it does not have as strong a smell as regular bleu cheese... It's still salty and sharp like bleu cheese... It melts and crumbles easily, so I cook with it a lot.

That was a big help, I know.

You're welcome.

Anyway, this post all started because of my dinner tonight. Two of my family members are eating elsewhere. That leaves just two of us.

I decided to make pasta but my son does not like red sauce. (Must be the part in him that's NOT Italian!)

What to do...?  What to do...?

I decided that he would have his favorite old standby of olive oil and Parmesan cheese (or butter and cheese). 

I, on the other hand, had a hankerin' for something special! We had some Gorgonzola in the fridge, so I decided to make a Gorgonzola Cream Sauce for my pasta.

I have made this sauce a few times, following a recipe, that also adds broccoli and is served over fettuccine.

I have no broccoli, but I knew I wanted this sauce! 

So, I consulted the cookbook that contained the recipe:

I skimmed over the "cast of characters"/ingredients ... Then, I threw caution to the wind.... I didn't measure a thing as I made a little bit of sauce for myself. (Gasp!) All of my measurements were "eyeballed", since I was only making a little bit of sauce for myself.

It was wonderful, just as I had hoped it would be! 

I started by bringing some white wine and chicken broth to a boil (maybe 1/2 cup of each). Then I added about 2 tablespoons butter, one cup half-and-half, one cup Gorgonzola. Simmer maybe five minutes, sauce will thicken somewhat. Add a sprinkle of pepper - the cheese is salty enough that you do not have to add additional salt!


Serve with grated Parmesan and fresh parsley:
OMG... He doesn't know what he's missing!

** Usually cream sauces call for heavy cream. Many times I substitute half and half because it is what I have on hand. Just know that it won't be as thick as it would've been using heavy cream, but the taste is the same!

Another way to use a Gorgonzola cream sauce is with steak.

Yes. Steak!

If you are hesitant at all, this recipe will make you fall in love with blue cheese!

Grilled ribeye steak with onion-Gorgonzola cream sauce

Grill your steak to perfection and then set it on top of this delectable sauce (courtesy of The Pioneer Woman). For original post, go to:

• melt one half stick of butter in the pan
• add one onion, sliced
• Cook over medium heat until onions caramelize (that is, start to get soft and brown)
• add 1 cup heavy cream (I use half-and-half) 
• Cook until heated through and starting to thicken (cream will take on the brownish color of the onions)
• Add 1 cup crumbled Gorgonzola. Heat through until melted, making sauce even thicker.
• Before serving, spoon the cream onto plate and top with your grilled ribeye.
Mmmm...

I need to learn how to make an appetizer I had once at La Cupola in Litchfield. It was "steamed mussels in a Gorgonzola sauce". I thought I had died and gone to Heaven when I ate that. I just about licked the bowl! When I do figure out how to make it I'll be sure to share!

I love having the cheese on hand, we use it so much. 

Last night I sprinkled it on my steak salad.

It goes especially well with pears -sometimes I throw them both in a salad.

My oldest son mixes chicken breast strips with hot sauce and then adds the bleu cheese to make a buffalo chicken sandwich.

Once I made a cranberry-pear tart that had crumbled blue cheese on top. It was made with leftover Thanksgiving turkey. I'll have to find that recipe! That was so good!

What are ways that you use Bleu cheese? I am always looking for new ways to incorporate this favorite ingredient!

Owls!

A few weeks ago I had a punch class featuring the Owl Builder punch:
We made three cards using that punch but none were owls! I was trying to show some of the other creative uses for that punch. You can view my post here, and see the three cards that we made:

That night, the class participants told me that they would love another class featuring the owls.

I never want to disappoint, so we had another class last night!  This time we made owls!

Each card features a different colored owl, some have different eyes, some have beaks - it doesn't matter how you make it it, is going to be cute when you are finished!

The nurse!

Her cap the same piece that is used as the owl belly (or vest, as I call it), just turned upside down and glued behind the head!

The red cross on her nurse's cap is a flower from the now-retired Itty-Bitty punch pack.

Finally, she gets the drowsy look from her eyelids, which are made from a single circle of Smoky Slate card stock. It is the same circle as the white eyes included with the owl punch.

Here is the second card:
For punch classes, I often pull from my retired supplies - I have so much stuff I need to get rid of! Like, in the previous card, I used Bashful Blue card stock, which is no longer available. Likewise, this card uses a retired color. Both the card base and the envelope liner are Lucky Limeade, a retired "In Color".
(The Envelope Liner framelits)

We stamped the Hardwood background stamp on the front of the card using Soft Suede ink. 
The card stock is Baked Brown Sugar, so it is a bit lighter.

The owl is also Soft Suede (card stock) with a Daffodil Delight belly. His feet were cut off before gluing him to the black circle and then to the card. 

I used a 2 inch circle from the Circle Framelits set.


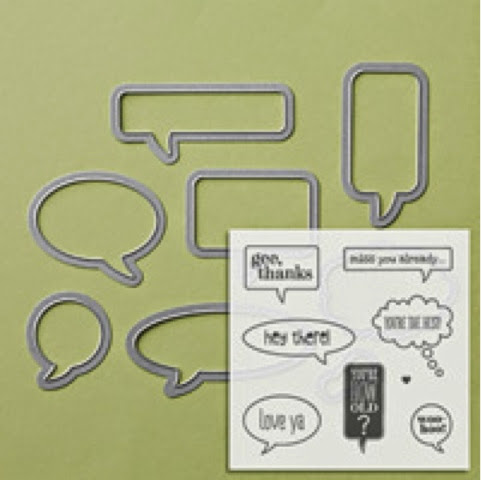
I also used the Word Bubbles framelit to cut out the coordinating "woo hoo" from the Just Sayin' stamp set. 

(*Framelits are for the Big Shot.)

The sentiment was stamped in Island Indigo ink. (Of course, I consulted the Color Coach to see which colors would look nice together. I still have the card for Lucky Limeade, so I used that as the point of reference.) Participants had a choice of either "Congratulations" or "Happy Birthday" for the inside of the card.

I should state here that all three cards were inspired from others that I found on the Internet. They are not exact copies!

Here is the front of the third card:
I call the technique "inlaid embossing". Isn't it fabulous? I used all sizes of circles in various Bold Bright colors using my many circle punches. I glued them onto Whisper White card stock first before running it through the Big Shot with the Square Lattice embossing folder. (I also stamped the sentiment first.) The result? You  can't even tell that they were separate circles of paper to start with!

Now here's the owl on the inside:
Isn't he precious?

Again I used a retired DSP (Summer Smooches) to make the owl belly and the envelope flap cover. (Gotta use this stuff up!) Both stamps are also retired.

Couple of things about this how that you need to know:
• He is hanging from a branch that comes from the "Bird on a Branch" builder punch.
• His wings are a piece of Chocolate Chip card stock, made with the 7/8 inch scalloped circle punch, and cut in half.
• This owl has a beak that I free-hand cut out of Pumpkin Pie card stock. (Notice there is no separate beak on the other two cards; you don't really need one if you place the eyes correctly)

** When working with the Owl punch, I have a couple of tips:
1) Have tweezers or a "QuickStik" on hand - there are lots of tiny pieces to work with!
2) Use Tombow multipurpose glue - its pointy tip makes it easier to apply glue to the little pieces! (sooo much easier then the SNAIL tape)
3) Have a container or baggie on hand for all of your "spare owl parts"! They are going to get punched out when you need a particular piece anyway, and you never know when you're going to need them in the future!
4) Have a trashcan nearby! Lots of "paper poop" with this punch!

As always I am here to help if you have any questions!

You can find these products and more by visiting my website at:
Just click on "shop" in the upper right-hand corner!


Wednesday, June 4, 2014

Graduation board

So, I haven't posted in a while....
Here's why:
I've been busy in my stamp room, but not stamping !

My oldest son just graduated from high school last night!

The "after-grad party committee" asked that each family create a board for their senior son or daughter.

It took a while just to go through pictures (with the extra time for reminiscing!). In the long run, I chose way too many pictures that could ever fit on that board!

I weeded them out as I began to glue things to the board. Some I "fussy cut" and added with Dimensionals. When all the pictures were in place, I covered awkward "intersections" of pictures with stickers and such I had in my scrapbook "stash".

Thank goodness they are finally used!

I like the top the most. See the baby head with the word bubbles coming out of it, in the upper left-hand corner of this pic (it's actually the center of the board)?
These are the only two stamps that I used on the whole board. They are from the Just Sayin' stamp set, embossed in at Tempting Turquoise embossing powder, and cut out with the matching Word Bubble framelits.
 I designed the board like a clock....

Pictures on the right-hand side show him as a baby, toddler, and in elementary school. That's why, to the right of the baby, there is a word bubble that ask,s "You're how old?"

Down at the bottom I have some pictures of the middle school years, junior high, and  I finish the board with high school and his senior picture.
See how it flows like time on a clock?
No?
Work with me, people!

Then, to the left of the baby, he finishes with "woo hoo!" in the word bubble to show his excitement that he made it through (or maybe that was just my excitement!)

In the middle of the board is a piece of card stock that I printed out with some quotes from a book that I bought him for graduation. 

The book is Oh, The Places You Will Go! by Dr. Seuss. It's a very appropriate book to give a newborn baby or graduate. 
This description from Amazon.com sold me:

"A perennial favorite, Dr. Seuss’s wonderfully wise graduation speech is the perfect send-off for children starting out in the world, be they nursery school, high school, or college grads! From soaring to high heights and seeing great sights to being left in a Lurch on a prickle-ly perch, Dr. Seuss addresses life’s ups and downs with his trademark humorous verse and illustrations, while encouraging readers to find the success that lies within. In a starred review, Booklist notes: “Seuss’s message is simple but never sappy: life may be a ‘Great Balancing Act,’ but through it all ‘There’s fun to be done.’”

What made this gift even more special was that I had asked all his teachers that he had in high school to sign it. It meant so much to him to read their fond words of encouragement.

They are gifts, I hope, that he will treasure  for a long time!

Saturday, May 24, 2014

What's cookin'? - Spicy Fish Taco Bowls

I hate fish.

I really do.
I mean, I love shellfish clams, crab, lobster...

But regular fish is not my friend.

I know every health book/website/doctor tells you to eat more fish.

 I just can't do it.

In fact, when I do buy it (because I know it's better for us) it's always the last thing I resort to. It gets pushed aside and looked over in the freezer all the time. When it's the last thing available, I always find some reason to get out of cooking dinner! ("Darn! I forgot we had to eat...! Let's order a pizza instead!")

I mean, my family likes it. It's just me. I usually have the smallest piece available when I do cook it, and even then I have to close my eyes and just swallow.

I have prepared many different types of fish many different ways... flounder, sole, whiting, tuna steaks, haddock... Baked, broiled, fried, aluminum-packet-on-the-grill... Yuk, yuk and more yuk!

I'll have to tell you, I finally found something that makes fish palatable (for me, anyway!).

Cover the fish taste - I found a winner!

Spicy fish taco bowls
It's actually healthy and delicious!
Brown rice, corn, black beans, red bell peppers, avocados, and tilapia .

INGREDIENTS
4 tilapia fillets
2T olive oil
1T cumin
1/4 t cayenne pepper
1t chili powder
2 cloves garlic, minced
2 green onions, chopped
1 red bell pepper, chopped
1 can corn, drained
1 can black beans, drained and rinsed
1/2 avocado, cut in small pieces
1 lemon
2c cooked brown rice

DIRECTIONS
• In a small bowl mix cumin, cayenne pepper and chili powder. Rub generously on both sides of tilapia fillets.

• Heat olive oil in large skillet over medium heat. Add fish to the skillet, cook for about three minutes on each side. (You want to make sure it gets almost blackened, and that the fish is cooked through - inside it should be white.)

• Remove fish from skillet and shred, using two forks.

• In the same skillet add: garlic, green onions, corn, and red pepper. Season with salt and pepper. Cook, stirring a few times (you want the corn to start browning, looking like it is roasted)

• Add the beans and heat through.
(Isn't it pretty?)

• To serve: layer rice, corn/bean mixture, fish, avocados and sprinkle with fresh lemon juice.

A little fresh cilantro would be great as well!

Yaaa! A fish dish I finally enjoy!