Showing posts with label class. Show all posts

Monday, May 23, 2016

Last call for retiring list items!


This past Friday night, May 20, I did another Facebook Friday live stream presentation about my favorite retiring stamp sets from Stampin' Up!

I also held a class that afternoon/evening, so I just held up the cards that we had made that night, featuring some of my favorites.

Card #1
From "World of Dreams" (Below), stamped on washi tape.


Card #2
This colorful card from "Bravo":
Dots were made with sponge daubers! Colors are Blackberry bliss (retiring), Mossy Meadow (retiring), and Calypso Coral.


Card #3
We used a clear block as a stamp on this card from "Serene Silhouettes":

Tap the clear block on an ink pad (you can also use markers to do this), spritz lightly with water so the colors blend a little, and then stamp!

Card #4
This masculine card was made with the  "Going Global" set:

If you act quickly, there is a Designer Series Paper stack that coordinates with the set along with the awesome "World Traveler" embossing folder (shown here). They are all in the Occasions mini catalog.


Card #5( and final card that we made) was from the popular retiring set "Giggle Greetings"- so popular that it must already be sold out, because I can't find a picture of it anywhere on the website!

-----

Just a reminder, that the last day to order anything from the retired list is May 31.
Everything on that retired list is "while supplies last", but actually I'm surprised with the excess supplies that they have this year. I have not really run into any major problems with items selling out!

This week only (May 21 through May 28), I am offering a special offer for last-minute orders!

Any order placed through my website that has a sub-total of $50 or more will be entered in a prize drawing!

I'm giving away some stamping "loot" to one lucky winner!
If you are placing an order, please visit my website:

Orders under $150 should also use this hostess code: GG4U4SZQ
If you have an order over $150 you should NOT use this code, as you  will earn your own free hostess benefits!

As always, THANK YOU!


Friday, April 29, 2016

Don't miss this class!


One of my favorite items that is in the Occasions catalog this spring has been "Enjoy the Little Things", a home decor item kit. It is so cute with its 13 inspiring "boards", displayed for all to see on an easel. It's quite a pity that many people have just glossed by this kit in the catalog!


I had all intentions of offering a class for this project cute in May, and I still do! However, since it is being retired, not having made it into the new catalog, we have to act fast if you're going to get in on the fun!


What I have done are two things:

1) ... obtained a hostess code
This is something that has been in the existence but I have neglected to use it - but this is the perfect opportunity!
You can go on my website and order the kit using the hostess code. This automatically puts all orders on one hostess order.
I will order all kits at once on May 1 at 9 PM.
They will be delivered to my home and I will sort and prep the kit for you before the class!

2) ...set a date for the class!
Sunday, May 15 from noon until 3 PM
$10 class fee (cash or check only please, payable at class)

I own the matching stamp set, all inks, and the adhesives you will need to complete your kit. 

Having each card's supplies sorted and packed beforehand is a huge timesaver for this project, making assembly of each card fly by!


Here's what you do....

First, you need to go on my website, and sign into your ordering account (or create a new one).http://www.stampinup.net/esuite/home/dandyspandy/

Using hostess code 7B4KM3A7, order your kit using item code #140587- $28 (if you choose to order the stamps that as well, the item code is #140958- $17).


You can pay with the credit card for that part.

Circle May 15 on your calendar!

There will be a $10 class fee due that day- cash or check only, please.

Let's do this!
Who's in?

PS: thank you, Nancy, for letting me use your completed kit for pictures!


Saturday, May 23, 2015

April stamp classes "to go" STILL AVAILABLE!

These are my two classes that I offered in April. 

 I've been remiss about blogging about them, however.

Both classes are still available as "classes to go", if you are interested!

April punch class "For the Ladies"

This class is available as an un-assembled kit.

All stamping is done, and all shapes have been punched for you! You just follow the example card to assemble.

Kit cost is $10 and includes three envelopes.

On the third card, I did no stamping except on punched ovals, so you have options if you don't need a "mother" card. (I used this card for Mother's Day!) 
These are beautiful cards to send to the females in your life!

Need masculine cards? The next punch class will focus on the men! 

The class is scheduled for Wednesday, June 2 at 6:30 PM. 

Punch class is $8 for those who attend.
$10 is the "to go" price.

I hope you can join me, or purchase the kit to go. These cards will be ready just in time for Father's Day!

----------
 April 2/5/15 Class 

2/5/15 classes
cost $15 for 10 cards (two each of five designs).  Envelopes are available optionally (10/$2 dollars).

If you missed the class (or cannot attend) and would like the class "to go", the cost is $20 for all cards made for you, including envelopes.

The April class, as well is this month's 2/5/15 class feature retiring stamp sets and accessories on all cards. (The May class is scheduled for this coming Friday, May 29, at 1 PM and 4 PM)

I will be placing one final order from the current catalog on Friday night!

If you know there is something you have to have and it's retiring please let me know before then. 

The new catalog goes live June 3.

Here are the cards we did last month and I will be posting the May cards soon!


Retiring items featured: Stippled Blossoms stamp set, Beautiful Wings embosslit die
The greeting used on this card is not retiring it's from the butterfly basics set.

Card #2
Retiring items featured: Mosaic Madness stamp set, Mosaic punch, Back to Black DSP, Four You stamp set, Coastal Cabana ink and card stock (this is one of the five retiring In-Colors this year).

Card #3
Retiring items featured: Blooming with Kindness stamp set

Card #4

Retiring items featured: Chalk Talk stamp set (the framelits that match are still in the new catalog), Tape It stamp set

And, card #5:


Retiring items featured: For the Birds stamp set, Hello Honey stitched satin ribbon (Hello Honey is in the 2014–2015 In Colors and they are still available - they just have different ribbon options this year!)


Stay tuned for this week's class featuring more items to retire. Get them before they're gone!

If interested in placing an order, please contact me through this blog or by email before this Friday.


Wednesday, March 18, 2015

Spring punch class "to go"!

Who's ready for spring?
ME! ME! ME!

Because we still have so much snow outside and parking is limited at my house, I have decided to only offer classes "to go" during the month of March. Hopefully April will bring better weather and lots of visitors to my stamp classes!

If you would like to purchase this un- assembled card kit, here are some things that you should know...

• kit cost: $10 (includes paper supplies for these three cards, envelopes and postage!)

• With the exception of the cloudy/ sunshine card I have decided to not stamp sentiments on the bunny card or daffodil card . By doing so, you can make it whatever you want… "Happy Easter", "happy spring", "happy birthday ", ... whatever!

• These kits will be available for purchase until March 31. Just email me/leave a comment below. Once payment is received I will mail your kit. Cash or check only, please.

A big "thank you" to the following stampers that inspired me with their creative originals: Julie Davison, Mackenzie Fuchs, and Karen at kraftingwithKaren.blogspot.com!


Thursday, February 26, 2015

February punch class-"Over the Hill"!

As the winter in New England dictates, my classes for February are only being offered on a "to go" basis.

It's too cold to go out and we have a lot of snow up here (with limited parking).

Getting together to "yuk it up" while stamping will have to wait until it gets a little warmer.

But you don't have to miss out on fabulous cards!

These are the cards I created for the February "Over the Hill" punch card class.

All three are birthday cards meant for "older" recipients (or, sadly, my age bracket!)

For just $10, you will receive in the mail an unassembled kit (and envelopes ) for creating the three cards you see here!

You can leave a comment below or email me with your request. I will need your $10 check, payable to me, Danielle George, no later than March 7.

I will also need your address (!) so that I can mail the kit out to you.

Here are notes about each card so that when you're you get your kit you can refer to this blog post:

Card #1:

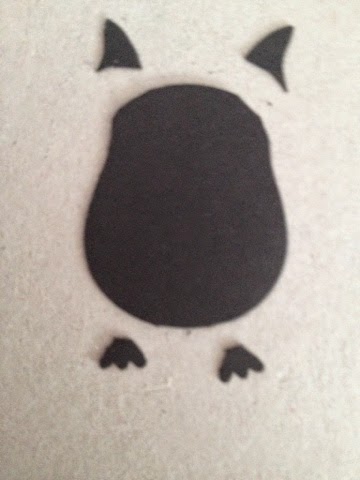
The penguin is made from the owl punch! 

Here is a step-by-step picture tutorial on how to create the penguin: (Please excuse the gold glitter on my silicone mat!)
• Cut off for the ears and feet of one black owl.

• Glue a scrap from an orange owl so that your "penguin" now has two orange feet. (does not matter what the scrap looks like!

•Add a white "vest" and an orange heart (pieces made with the owl punch)


• Add white eyes and make black pupils with a marker. (The punch also can make these but they are just too small to handle!)

• From a second black owl, cut out wings as shown:
• Tear a piece of white card stock and half to appear as a snowy hill!

Card #2:

This one is easy peasy!

•Glue a colored 1/2" card stock circle to the black 1 1/4" circle, then make a hole right in the middle with either a paper piercing tool or a 1/16 " hole punch.

•Add a small brad.

•Attach to card with dimensionals.

Card #3:
Believe it or not, this card is made again with the aid of the owl punch!

Each balloon requires that you cut 1 foot off of an owl. Leave yourself a little piece to adhere glue!

I talked baker's twine with a glue dot. Each balloon was then attached to the silver glimmer paper with a Dimensional.
(I also added accents with my white gel pen on the black balloons.)

A glue dot holds all the balloon strings in place before the bow is attached.

Ready to be given!