Sunday, November 23, 2014

Fall STAMP CLUBS!

My goodness!

It seems as though I have so many pictures on my phone from fall stamp clubs and I haven't blogged about them!

It's time to play catch-up and delete those babies! They are taking up valuable storage space!

I still have early December classes (punch class and packaging class) and clubs, and I know I will be sure to do fun projects there, so I have to do these now!

I won't post everything we did because some are as old as Halloween! But... I'll be sure, though, to share with you things that you can still make like Thanksgiving goodies and Christmas ideas...

-------
SEPTEMBER STAMP CLUB:
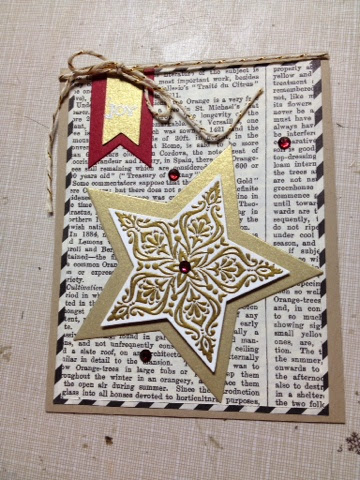
Paper: Crumb Cake, Whisper White, Cherry Cobbler and Brushed Gold card stocks, Typeset specialty DSP

Stamp set:  Bright and Beautiful (Holiday catalog)

Ink: VersaMark 
Other: Star framelits for Big Shot, gold baker's twine, gold and white emboss powders , rhinestones, Cherry Cobbler Blenabilities marker 


OCTOBER STAMP CLUB:

This months meeting was fun because I was able to enhance our learning experience by using a projector! By doing so we were able to watch a video about the "Zentangle" process (see card below), and also view several samples of projects using our featured stamp club sets!

After watching a great video by "Understand Blue" http://youtu.be/KYAGeSeGZww . Here's the card I created:
Here is a close-up:

Stamps: Blended Bloom, Petite Pairs
Paper: Basic Black and Whisper White cardstock, Back to Black DSP

The beauty of this project was that no two people have the same doodles within their Blended Bloom flower! 


Here is Pam A. showing her creation:
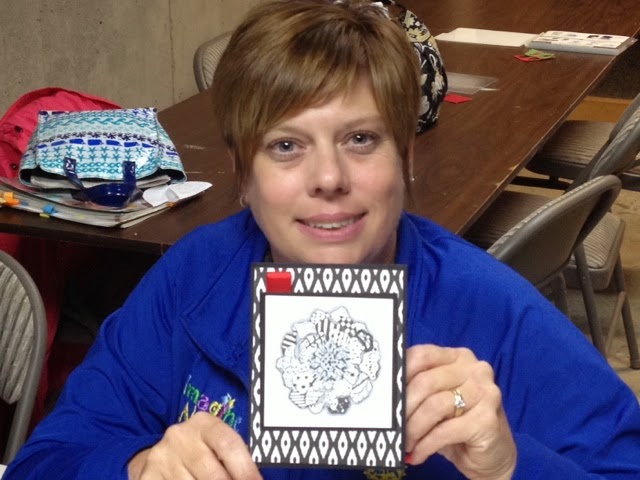
.... And Lisa B. (being "photo-bombed" by Patty D.!

We found that the journal pensfor Project Life by Stampin' Up! were perfect for this project!
--------
By far, my favorite project of this whole season was the "caramel apple"!

This was a case of a project I originally viewed on Pinterest!

It is made with the Curvy Keepsakes Box thinlits for Big Shot, and filled with caramel candies.


The apple and leaf come from the Fun Fall framelit set, also in the Holiday catalog.  The apple is actually a circle tag! We just hand cut a curve in the bottom of it so it resembled an apple.


Finishing touches were a doily, black baker's twine, a banner greeting and a fun straw/stick leftover from the June My Paper Pumpkin patriotic pinwheels kit!

NOVEMBER STAMP CLUB:

This month my catalog coupon is for a free pack of gift card enclosure envelopes when you purchase any kit. 


Of course they are made to hold the ever-popular gift card, but I wanted to show you something else you could do with them:
By scoring 1/2 inch away from three of the creases, we were  able to fold it into a dimensional, small pouch! We decorated it with a belly band made of the Nordic Noel DSP and a tag featuring the Santa Stash stamp set (with matching mustache framelit).
Embellishments on this project included Real Red cotton ribbon and the new Frosted Sequins (shown in the Holiday catalog)
------
We made this cute little box tote:

Is made by gluing two of the Tiny Treat Boxes together (with lids open)!
To decorate we used:  the convenient Under the Tree Tag a Bag accessory kit, Santa & Co. DSP, Visions of Santa stamps (and on mine) the 12 Days of Christmas stamp set(Holiday SUPPLEMENT).
------
Last but not least, we prayed with my many Merry Stars kit from the holiday SUPPLEMENT.
Holy smokes! You get so much stuff in this kit!
Each club member was invited to choose a star of their choice to create. We had fun using various embellishments that came with the kit!

Here are some of our creations:


Stampin' Up! also gives other creative uses for the kit:
Small stars used as place settings...
A lighted garland....
Tree-shaped stacked boxes....
I could go on! I am sure you can use your imagination (or search Pinterest!) for ideas to use the kit contents to create cards, lidded boxes etc.

Have fun!

We did!
------

We are always having fun as we create what are Stampin' Up! product!

For more information about stamp clubs or to purchase any of the SU! products please contact me!

Email: Dandyspandy@sbcglobal.net


Friday, November 7, 2014

Christmas card punch class!

The first Christmas card punch class has passed, but there will be a second, different one, early in December. If you missed this one and didn't take advantage of the "to go" kit, you still have an opportunity to make really cute cards out of punched shapes!

I already showed you the first two cards during a sneak peek on this blog, Pinterest and Facebook.

I will start, however, with the third, unseen, card because it is new and it was the most simple!

Just by using two punched trees and a punched star we have a simple, fast Christmas card that is utterly delightful!

Paper: crumb cake and chocolate chip card stocks, Trim the Tree DSP paper stack (Holiday catalog), red glimmer paper

Punches: tree punch (Holiday catalog), star (from Itty Bitty Accents punch pack)


Ink: Cherry Cobbler
Stamps: Sassy Salutations 

Other: linen thread, gold basic metal buttons (Holiday catalog)

NOTES: I punched three trees in total: two out of DSP and one out of chocolate chip card stock. Then I could just trim away the tree trunk and glue it to the back of the DSP trees (I snipped off the tree trunks on those)
The other option of course, is to glue one DSP tree directly to the cardstock tree, but my hands weren't steady enough to get them glued evenly:
Fold one of your DSP trees/triangles in half and glue directly to the center of the flat tree. I used my favorite liquid multipurpose glue, but even glue dots would work.
By doing this you can add dimension to the card and it will still fold flat when mailing/giving!

Tie it all up with some linen thread and the gold button. DONE!

Phew! That was a long explanation for a five minute card! LOL
---------

By the way does any one else's work area look like this, or is it just me?
Really!

I have a 10-foot countertop on which to work but I end up with about 6 inches of workspace! As I'm working on a card all of the supplies just get thrown around - crowding any available space!

There must be a name for this condition....

I already suffer from "stampers butt", so I know there's a name for this out there as well. If you know it, let me know and I will bring it up at my next therapy session and see if I can't be cured.
UGH!
-----
One of the things I like about a punch class is that I use up some of my scraps. It's easy to punch pieces out of small leftover pieces of cardstock from other cards and/or projects!

Another thing that I like is that I often use retired products. At this class I don't feel the need to use all current items because many of my customers already own the punches that I use, and unlike club, there is no purchase commitment.

With that in mind, I bring you the next two cards...

Card #2

It is an exact copy of the card created by demonstrator Michelle Suit.

Paper: Garden Green, Basic Black, and Baked Brown Sugar cardstocks, Season of Style DSP paper stack (retired), red glimmer paper
Punches: 1" circle and 3/4" circle punches, snowflake punch (retired), circle framelits for Big Shot
Ink: Whisper White pad (can also use StazOn white), Black marker, White chalk marker

Stamp: Merry Little Christmas (retired)
Other: sponge daubers, silver 1/8" ribbon

Card #3


I created a card after seeing a picture of this ornament on Pinterest:
It was posted by Mercedes Weber, a member of the SU Artisan design team, on her blog last year. But, from what I understand after reading the post, it actually was a creation by her (then) 7-year old daughter Cami, in an effort to sell them and earn money for donation. WHAT A THOUGHTFUL CHILD! And, CREATIVE!

I turned it into a card by adding a few current elements:

Paper: Crumb Cake, Real Red, Coastal Cabana, Whisper White, and Basic Black cardstocks, Season of Style DSP paper stack (retired)
Punches: 1 3/8" circle, extra large oval, round tab punch (retired,) Festive Flurry framelits for Big Shot (retired), circle framelits for Big Shot, and Bitty Banner framelits for Big Shot

Ink: Basic Black, Whisper White (for sponging)
Stamp: greeting from White Christmas (Holiday catalog)
Other: Decorative Dots embossing folder,
Filigree Frame embossing folder (Holiday catalog), 
and frosted embellishments (retired)

**NOTE: For the scarf, I simply used the largest of the Bitty Banner framelits, cut it to fit his neck and used the leftover for the other piece of scarf.

Also, I lightly sponged white craft ink over the Filigree Frame-embossed card front.

For the greeting I simply "flagged" a long strip of white card stock and scored it twice on each side, adding Dimensionals under the main piece to make it pop up!

-----
I hope you find these explanations helpful whether you purchased the un-assembled card kit from me or you own all the punches and want to re-create these cards on your own.

To purchase any of these items please visit my website and click on "store" in the upper right-hand corner. http://www.stampinup.net/esuite/home/dandyspandy/

Hope to see you at the next Christmas card punched class! 
Date will be announced soon!

Sunday, November 2, 2014

Christmas card punch class sneak peek!

I have two cards finished and I wanted to share them with you...
Isn't he cute?


I'm having a Christmas card punched class - here are the details:

Wednesday, November 5 at 6:30 PM
$8 for 3 cards + envelopes
Deadline to register is Tuesday at noon!

Can't make the class?

Try my "class to go"!
$10 for the kit (unassembled cards)
Same registration deadline as above.

Isn't he cuter?

Don't miss out on these cards!

After the class meets, I will post all the details for these two cards plus the third card!

Monday, October 27, 2014

Pumpkin Spice Cheesecake Enchiladas (with caramel drizzle)


Oh.... my.... Gee....
These were great!

So... fall has officially been welcomed in all of its capacities here at the George house... Cooler weather means that the heat has been turned on despite my husband's protests, endless falling leaves from the woods cover the long driveway and yard in hopes of someday maybe being raked, my Longaberger Fall Foliage dishes have replaced the red, white, and blue "summer" dishes (don't judge), and all sorts of  "fall-flavored" food and drinks are being prepared.

I do like some pumpkin flavored foods and drinks, but I'm not one of those people that have to have everything pumpkin-flavored come fall. I like to bake with a lot of apples at this time of year too...  squash... just baked goods, in general, I guess, and warm comfort foods. 

Fall is, after all, "sweater weather".... So, maybe my "sweaters" are made of extra pounds? I'll have to watch that...

Anyhoo, this recipe IS for the pumpkin lovers out there!

Sooo easy! Sooo delicious!


Pumpkin Spice Cheesecake Enchiladas

Yield: 9-12 servings

1 pkg.  (8 oz.) cream cheese, softened
1 cup  canned pumpkin
1/2 cup  sugar
1/2 tsp.  pumpkin pie spice
2½ cups Cool Whip, thawed
18-24 Flour tortillas
6 tbsp. butter, melted
2 tsp. sugar
2 tsp. cinnamon
Caramel sauce

In a large bowl, beat the cream cheese, pumpkin, sugar and pumpkin pie spice with electric mixer on medium speed until well blended. Gently stir in the whipped topping. 

**Divide the cream cheese mixture evenly between the tortillas. Roll each tortilla up and put on serving plates. In a small bowl, combine the butter, sugar and cinnamon. Brush the mixture over the over the rolled tortillas. Top with caramel sauce. 


** (this is the exact recipe that I found on Pinterest.  It comes from the website  http://www.lovebakesgoodcakes.com/2013/10/pumpkin-spice-cheesecake-burritos-with.html?m=1

The only thing I changed is this:

Before filling tortillas: brush each tortilla with melted butter, cinnamon and sugar mixture. Place in a hot frying pan and cook, maybe, 30 seconds on each side.
Frying the tortillas first before filling makes them a little more firm, so they are not flopping around when you fill them or try to eat them. (an old Spanish teacher trick!)
YUM!

There you have it!

A no-bake, fancy-looking dessert for fall that every one will love!

You're welcome.