Showing posts with label club. Show all posts

Friday, January 15, 2016

"No meeting" Sale-a-bration club!


You read that right!

This year, during the annual SAB period at Stampin' Up ( January, February, March) I have decided to try something new.

Many of you do not like to go out in the winter time and let's face it, I don't have the most winter – friendly driveway! BUT none of us want to miss out on placing orders right now!

So… I got to thinking... What if I hosted a club for these three months and we did not have a physical meeting? 
With three of you joining your orders together, at $50 each, (enabling you to get a free item from the SAB brochure) the $150 would be enough to submit a workshop.
When we do that, we earn hostess benefits! And one of YOU earn free hostess benefits each month!

No driving in snow!
No cold basement!
No steep, icy driveway!
Just ordering like you would anyway, and FREE STUFF!

I will make 2 to 3 cards each month and put them in with your order when it arrives.

I will take pictures and send those to you before you put your order together, with notes. That way, if you see something you like you can add it to your order for the month.

If you are local, we will make arrangements for pick up or delivery when the order arrives.

If you are long distance, I will quickly mail out your order to you!

As you may be familiar, SAB allows you one free item from the SAB brochure when you spend $50 before shipping handling and tax.

The choices this year, as always, are fantastic! Several of them coordinate directly with the items in the new Occasions catalog-so, of course, you just have to have everything that matches!

That's not all! 
There are three items in the SAB brochure that are available for a limited time!


That's right!
After February 15 the last three items shown in the brochure will be gone and will be replaced with three new items, just in case we have already collected all of the selections.

You can view the Sale-a-Bration brochure online here:


The new Occasions catalog gives us even more to drool over!
Good thing that goes until May 
31, huh? 
Browse the catalogue here:
If you would like a brochure, and are not currently working with another demonstrator, contact me and I will send one to you.

OK, time is running out to get involved!

Last week I sent out an email about my idea and received an overwhelming response!

I thought I had better advertise this a little more to see if anyone else is interested.

You need to tell me ASAP if you're interested- you can email me, text me, or leave a comment on this blog.

The first order, for January, is due with payment no later than January 27.

For each club we need three people who are interested in placing a $50 order each month (January, February, and March).

Oh, and one more thing...
There is a sale on the three-month pre-paid subscription to My Paper Pumpkin, making a $50 order even easier!

Don't miss out! Contact me today!

Monday, April 13, 2015

April stamp club

This month we are making three projects, highlighting product from the Occasions catalog.

The first project we will do is a berry basket, because we didn't have time to do it last month as I had planned. Instead of adding a handle to make it an Easter- themed basket (as originally planned ), we will just do one that I had made for a friend.
I used the new Berry Basket die for the Big Shot and our coaster board to make it extra sturdy.

Don't forget that you can make the basket just out of card stock or DSP, but if you really need a sturdier basket, take this route! You can cover this with card stock, stamp on it or even emboss the sides with an embossing folder! You can decorate it any way you like, of course, - the possibilities are only limited by your imagination!

We are also going to make the little plant pick that you see here. It doesn't matter what the basket contents are, it is just so darn cute, SO BE SURE TO ADD ONE! For that, we are using From the Garden bundle:

Speaking of bundles... At April club it is "bundle-mania"!

The next two projects involve two different bundles and I am interchanging elements from each of them: Crazy About You and Petal Potpourri:


The first bundle features the stamp set  Crazy About You and the Hello You thinlet dies. Both are available for purchase separately.

The Petal Potpourri bundle features a stamp set and the coordinating Flower Medallion punch. The punch is also designed to work with one of the flowers in the Crazy About You set!

Here are the cards were making:

This card was inspired by Connie Stewart, and features the technique known as "zen doodle".


And, this card was inspired by Connie Babbert. I love how all the colors from the Gold Soirée DSP are in this card, including the metallic gold!

I finally got to use my Party Pennants Bigz die for the Big Shot, too!

This stamp club is full, but if you are interested, I will be beginning the Summer Stamp Clubs soon. Summer clubs run June, July and August. Each club has three participants who agree to purchase $50 of catalog merchandise  each month.

That is usually easy to do because we have a new catalog coming out in June!

In fact, the retiring list will be announced earlier than ever before-  April 17 - so, stay tuned!

REMINDER: accessories on the retiring list are available only until supplies last! Don't forget that on the retiring list this year will be the In Colors 2013–2015 (Strawberry Slush, Crisp Cantaloupe, Pistachio Pudding, Baked Brown Sugar and Coastal Cabana)
If you need any of the ink refills, more card stock, etc. in these colors, don't wait until the last minute!

Thursday, January 22, 2015

January stamp club

I am so excited about the new Occasions catalog and the free product offered this year in the Sale-a-Bration brochure! At stamp club this month I was sure to use all new product so that everyone could be as excited as me!

Remember, Sale-a-Bration is a very special time of the year for Stampin' Up!.  For each $50 subtotal of your order (you do not have to split your order up) you will earn one free choice from the mini brochure!

And this year the choices are spectacular! There are stamp sets, 2 Designer Series Paper packs, an accessory pack and all current Blendabilities are available as a free selection (one three pack per free selection)!
Example:


Here's what we made in stamp club this month:

Card #1:
A quick card, really.

We tried our hand at the "chalkboard" technique - we used the new chalkboard paper as well as a new chalk pad!  (The greeting is from the new set Big on You) Details were drawn with our white chalk marker (available in our main catalog). I will describe further this  EASY "chalkboard" technique in an upcoming post!


Also used on this card was a piece of the Best Year Ever DSP (a free selection from Sale-a-Bration), and the new, clear Itty Bitty Accents epoxy stickers - can you see one there on the heart?


I was rather boring - cutting our new washi sheets into strips so that it resembled plain, ol' washi tape! It will be a lot more fun once I get a hold of some framelits to use on the sheets of washi tape paper and cut it into shapes!


Card #2:
My prediction: the two most popular choices of free Sale-a-Bration product this year... the Lotus Blossom stamp set  and the Irresistibly Yours DSP pack.

I plan to feature the stamp set in just a few days, so I will explain and show you by pictures how this is a three-step instead of a two-step stamp set. GORGEOUS!

The Irresistibly Yours DSP doesn't look like much when you see it in the brochure... that's because it's white paper with different white embossed images. The magic of this paper is adding color - the embossed images will resist color!

For example, on this card we applied Wild Wasabi ink to the leaf piece and Pink Pirohuette ink to the shorter piece. The white vine/flower is the result of the "emboss resist" technique! (you can view my info about this technique by clicking here:http://dandyspandy.blogspot.com/2014/01/so-lets-get-this-party-started.html?m=1)

A touch of gold finishes it off - gold baker's twine and sequins.

Card #3:
This card was inspired by a card I had seen by Deb Valder: 
I used the new butterfly thinlit dies and also a piece of the Painted Blooms DSP.


It looks as though the butterfly is just filled in with white card stock when in fact, it's on and a window sheet, so it appears to be floating!
The butterfly is cut out, as I mentioned before, using the new butterfly thinlits.

You can visit my last post for a quick release tip of this detailed die:http://dandyspandy.blogspot.com/2015/01/new-love-butterfly-basics-bundle.html?m=1

A window sheet/acetate is glued behind the opening with glue dots. The butterfly is then placed back in the opening and actually glued to the window sheet- we used a two-way glue pen to do this.
Another favorite new set of mine is Painted Petals from the Occasions catalog! We used just a few stamps from that set to decorate the inside. LOVE THIS SET!


We tied a "double fork bow" to the front of the card to finish. Again, I used the help of another demonstrator's video. Here is the link that we used:  http://youtu.be/VWou4GtMD-Q 
Also note that you can make a smaller or larger "fork bow", and they each have their own video!

I can't wait to give you further details on some of these feature products! I plan on doing so in future posts.

It's easy to spend $50 with all the great  products featured in the Occasions catalog! If you order before March 31, you will be able to pick a free Sale-a-Bration item per $50 total.

You can view both of those mini catalogs here: http://www.stampinup.com/ECWeb/default.aspx

If you did not receive one in the mail at the end of December, but you would like one, please contact me, either by way of this blog or through email, and I will see that you get on!. (If you have a regular demonstrator I will ask that you contact him/her first.)

You can always order online 24/7 on my online store! http://www.stampinup.net/esuite/home/dandyspandy/
Click here and once you're on my web page, click "shop" in the upper right-hand corner.

Have fun!

PS: There will be no clubs held in the month of February. I would like to start new rounds of clubs in March. If interested in this monthly meeting of five ladies please contact me, either through this blog or by email! (Dandyspandy@sbcglobal.net)


Sunday, November 23, 2014

Fall STAMP CLUBS!

My goodness!

It seems as though I have so many pictures on my phone from fall stamp clubs and I haven't blogged about them!

It's time to play catch-up and delete those babies! They are taking up valuable storage space!

I still have early December classes (punch class and packaging class) and clubs, and I know I will be sure to do fun projects there, so I have to do these now!

I won't post everything we did because some are as old as Halloween! But... I'll be sure, though, to share with you things that you can still make like Thanksgiving goodies and Christmas ideas...

-------
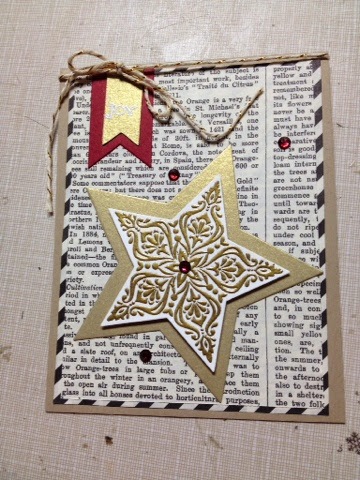
SEPTEMBER STAMP CLUB:
Paper: Crumb Cake, Whisper White, Cherry Cobbler and Brushed Gold card stocks, Typeset specialty DSP

Stamp set:  Bright and Beautiful (Holiday catalog)

Ink: VersaMark 
Other: Star framelits for Big Shot, gold baker's twine, gold and white emboss powders , rhinestones, Cherry Cobbler Blenabilities marker 


OCTOBER STAMP CLUB:

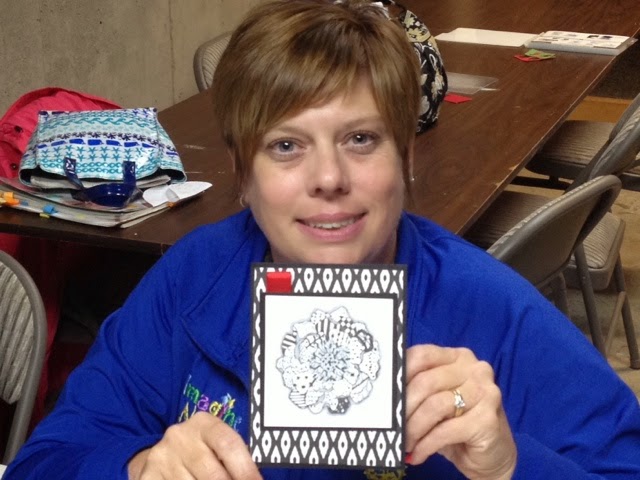
This months meeting was fun because I was able to enhance our learning experience by using a projector! By doing so we were able to watch a video about the "Zentangle" process (see card below), and also view several samples of projects using our featured stamp club sets!

After watching a great video by "Understand Blue" http://youtu.be/KYAGeSeGZww . Here's the card I created:
Here is a close-up:

Stamps: Blended Bloom, Petite Pairs
Paper: Basic Black and Whisper White cardstock, Back to Black DSP

The beauty of this project was that no two people have the same doodles within their Blended Bloom flower! 


Here is Pam A. showing her creation:
.... And Lisa B. (being "photo-bombed" by Patty D.!

We found that the journal pensfor Project Life by Stampin' Up! were perfect for this project!
--------
By far, my favorite project of this whole season was the "caramel apple"!

This was a case of a project I originally viewed on Pinterest!

It is made with the Curvy Keepsakes Box thinlits for Big Shot, and filled with caramel candies.


The apple and leaf come from the Fun Fall framelit set, also in the Holiday catalog.  The apple is actually a circle tag! We just hand cut a curve in the bottom of it so it resembled an apple.


Finishing touches were a doily, black baker's twine, a banner greeting and a fun straw/stick leftover from the June My Paper Pumpkin patriotic pinwheels kit!

NOVEMBER STAMP CLUB:

This month my catalog coupon is for a free pack of gift card enclosure envelopes when you purchase any kit. 


Of course they are made to hold the ever-popular gift card, but I wanted to show you something else you could do with them:
By scoring 1/2 inch away from three of the creases, we were  able to fold it into a dimensional, small pouch! We decorated it with a belly band made of the Nordic Noel DSP and a tag featuring the Santa Stash stamp set (with matching mustache framelit).
Embellishments on this project included Real Red cotton ribbon and the new Frosted Sequins (shown in the Holiday catalog)
------
We made this cute little box tote:

Is made by gluing two of the Tiny Treat Boxes together (with lids open)!
To decorate we used:  the convenient Under the Tree Tag a Bag accessory kit, Santa & Co. DSP, Visions of Santa stamps (and on mine) the 12 Days of Christmas stamp set(Holiday SUPPLEMENT).
------
Last but not least, we prayed with my many Merry Stars kit from the holiday SUPPLEMENT.
Holy smokes! You get so much stuff in this kit!
Each club member was invited to choose a star of their choice to create. We had fun using various embellishments that came with the kit!

Here are some of our creations:


Stampin' Up! also gives other creative uses for the kit:
Small stars used as place settings...
A lighted garland....
Tree-shaped stacked boxes....
I could go on! I am sure you can use your imagination (or search Pinterest!) for ideas to use the kit contents to create cards, lidded boxes etc.

Have fun!

We did!
------

We are always having fun as we create what are Stampin' Up! product!

For more information about stamp clubs or to purchase any of the SU! products please contact me!

Email: Dandyspandy@sbcglobal.net