Showing posts with label punch. Show all posts

Saturday, May 23, 2015

April stamp classes "to go" STILL AVAILABLE!

These are my two classes that I offered in April. 

 I've been remiss about blogging about them, however.

Both classes are still available as "classes to go", if you are interested!

April punch class "For the Ladies"

This class is available as an un-assembled kit.

All stamping is done, and all shapes have been punched for you! You just follow the example card to assemble.

Kit cost is $10 and includes three envelopes.

On the third card, I did no stamping except on punched ovals, so you have options if you don't need a "mother" card. (I used this card for Mother's Day!) 
These are beautiful cards to send to the females in your life!

Need masculine cards? The next punch class will focus on the men! 

The class is scheduled for Wednesday, June 2 at 6:30 PM. 

Punch class is $8 for those who attend.
$10 is the "to go" price.

I hope you can join me, or purchase the kit to go. These cards will be ready just in time for Father's Day!

----------
 April 2/5/15 Class 

2/5/15 classes
cost $15 for 10 cards (two each of five designs).  Envelopes are available optionally (10/$2 dollars).

If you missed the class (or cannot attend) and would like the class "to go", the cost is $20 for all cards made for you, including envelopes.

The April class, as well is this month's 2/5/15 class feature retiring stamp sets and accessories on all cards. (The May class is scheduled for this coming Friday, May 29, at 1 PM and 4 PM)

I will be placing one final order from the current catalog on Friday night!

If you know there is something you have to have and it's retiring please let me know before then. 

The new catalog goes live June 3.

Here are the cards we did last month and I will be posting the May cards soon!


Retiring items featured: Stippled Blossoms stamp set, Beautiful Wings embosslit die
The greeting used on this card is not retiring it's from the butterfly basics set.

Card #2
Retiring items featured: Mosaic Madness stamp set, Mosaic punch, Back to Black DSP, Four You stamp set, Coastal Cabana ink and card stock (this is one of the five retiring In-Colors this year).

Card #3
Retiring items featured: Blooming with Kindness stamp set

Card #4

Retiring items featured: Chalk Talk stamp set (the framelits that match are still in the new catalog), Tape It stamp set

And, card #5:


Retiring items featured: For the Birds stamp set, Hello Honey stitched satin ribbon (Hello Honey is in the 2014–2015 In Colors and they are still available - they just have different ribbon options this year!)


Stay tuned for this week's class featuring more items to retire. Get them before they're gone!

If interested in placing an order, please contact me through this blog or by email before this Friday.




Wednesday, March 18, 2015

Spring punch class "to go"!

Who's ready for spring?
ME! ME! ME!

Because we still have so much snow outside and parking is limited at my house, I have decided to only offer classes "to go" during the month of March. Hopefully April will bring better weather and lots of visitors to my stamp classes!

If you would like to purchase this un- assembled card kit, here are some things that you should know...

• kit cost: $10 (includes paper supplies for these three cards, envelopes and postage!)

• With the exception of the cloudy/ sunshine card I have decided to not stamp sentiments on the bunny card or daffodil card . By doing so, you can make it whatever you want… "Happy Easter", "happy spring", "happy birthday ", ... whatever!

These kits will be available for purchase until March 31. Just email me/leave a comment below. Once payment is received I will mail your kit. Cash or check only, please.

A big "thank you" to the following stampers that inspired me with their creative originals: Julie Davison, Mackenzie Fuchs, and Karen at kraftingwithKaren.blogspot.com!


Thursday, February 26, 2015

February punch class-"Over the Hill"!

As the winter in New England dictates, my classes for February are only being offered on a "to go" basis.

It's too cold to go out and we have a lot of snow up here (with limited parking).

Getting together to "yuk it up" while stamping will have to wait until it gets a little warmer.

But you don't have to miss out on fabulous cards!

These are the cards I created for the February "Over the Hill" punch card class.

All three are birthday cards meant for "older" recipients (or, sadly, my age bracket!)

For just $10, you will receive in the mail an unassembled kit (and envelopes ) for creating the three cards you see here!

You can leave a comment below or email me with your request. I will need your $10 check, payable to me, Danielle George, no later than March 7.

I will also need your address (!) so that I can mail the kit out to you.

Here are notes about each card so that when you're you get your kit you can refer to this blog post:

Card #1:

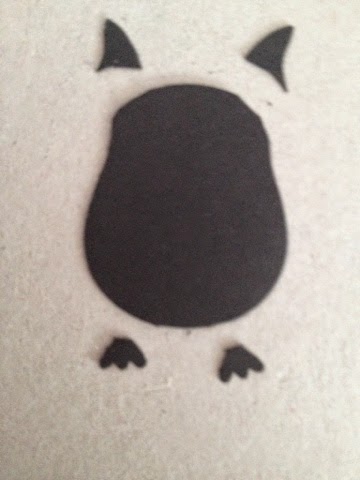
The penguin is made from the owl punch! 

Here is a step-by-step picture tutorial on how to create the penguin: (Please excuse the gold glitter on my silicone mat!)
• Cut off for the ears and feet of one black owl.

• Glue a scrap from an orange owl so that your "penguin" now has two orange feet. (does not matter what the scrap looks like!

•Add a white "vest" and an orange heart (pieces made with the owl punch)


• Add white eyes and make black pupils with a marker. (The punch also can make these but they are just too small to handle!)

• From a second black owl, cut out wings as shown:
• Tear a piece of white card stock and half to appear as a snowy hill!

Card #2:

This one is easy peasy!

•Glue a colored 1/2" card stock circle to the black 1 1/4" circle, then make a hole right in the middle with either a paper piercing tool or a 1/16 " hole punch.

•Add a small brad.

•Attach to card with dimensionals.

Card #3:
Believe it or not, this card is made again with the aid of the owl punch!

Each balloon requires that you cut 1 foot off of an owl. Leave yourself a little piece to adhere glue!

I talked baker's twine with a glue dot. Each balloon was then attached to the silver glimmer paper with a Dimensional.
(I also added accents with my white gel pen on the black balloons.)

A glue dot holds all the balloon strings in place before the bow is attached.

Ready to be given!

Thursday, January 29, 2015

Punch class -"love is in the air"

How does that saying go ? "The best-laid plans of mice and men often go awry".... 

"Love is in the Air" punch class- Wednesday, January 28, 2015 @ 6:30 PM

I had scheduled this punch class for last night but due to the snowstorm we had on Tuesday, I had to cancel because, although my driveway was clear (!), there was nowhere to park!

I will not be rescheduling this class due to time constraints!

Therefore, this class is now available only on a "to go" basis.

Please let me know by Sunday, February 1 if you would like to purchase these un- assembled cards, and I will mail them out to you on Monday. Cost: $10 for a kit to make all three cards (plus envelopes).

I showed you a preview the other day. Now I would like to go over the details so you can assemble them at home.

Card #1: lovebirds
I had this card pinned on my Pinterest "punch cards" board. Unfortunately, I don't remember the original pinner's name, so as to give the credit for this card idea. (sorry!)

Making a chickadee using the bird builder punch is something I had done before.

 A few years back, I had offered a series of punch classes called "birdwatchers". Using the above punch we were able to create a variety of bird species.

Basically, you punch out birds/wings from different colors of card stock, cut them and layer them. A white gel pen and/or a fine-tip black marker will help you make simple eyes.

For the chickadee, you will need to punch out a white bird, a gray bird and a black bird. You also need one gray wing.

In the picture below you can see the blue bird "templates" that I followed for cutting the gray and black birds into pieces:
By doing this, I was able to layer on the white bird a black head and a gray back area. Then, I simply added the gray wing and added sponging to his white breast area.

The branches also come from the same punch.

The hearts were made by using an old Embosslit I had  for the Big Shot called "Fashionable Hearts".


Card #2: robot
I loved this card as soon as I saw it! I even knew who I was going to send it to - my nephew Sam. He is going to love this card! Not only is every four-year-old boy a fan of robots, (and this one is too cute!) BUT what makes it even better is that a Hershey nugget (affixed with some glue dots) fits perfectly to the body:

Aside from the greeting I chose, this is pretty much a CASE of a card by Dawn Olchefske.

It is made with circle punches, a couple of hearts, and a couple pieces of scrap paper! 

The brushed silver strips for arms and legs are accordion-folded at every quarter inch. (2 1/2" x 1/4") You'll probably have longer legs than you want, so be sure to snip a little off so that you can use it for his neck!

Here is the link to her fabulous video which gives you dimensions and explains how to put it all together!


Card #3: phone


How cute is this?

My iPhone is like my "third arm", so making a valentine that looks like a smart phone was a natural choice!


She will have all the dimensions for you there, but basically you start with a 3 x 11" piece of colored card stock and score it at 5 1/2 inches.

To the corner-rounded screen piece you're going to add your "text message".

You can add anything you want when you use the Word Bubble framelits for your Big Shot:
I followed her lead and used greetings from the coordinating Just Sayin' stamp set:
It's a perfect card to give my husband ANYtime because I genuinely miss him as soon as he walks out the door ,and we text each other several times throughout the day. (Aaawww...)

PERFECT!

I love these cards and I know you will too!

If you don't own all the punches why not try my class "to go"?

I will do all the punching and stamping for you! The only thing you need to do is glue! (As always, I highly recommend Tombow Multi glue because it's great for using on small pieces that we often encounter in punch class.)

If you do decide to take me up on this offer, please email me or leave a comment below by this Sunday and I will send you my address so you can send your cash or check.


Tuesday, January 27, 2015

A Tuesday tip -layering punches

A few of my recent posts have featured cards where more than one punch was used to make an element.

For example, on this card you can see that I double-punched a heart:
(Perhaps that is an even better title for this technique - "Double Punching".
After all, you're technically not layering punched shapes on top of one another...)

So ,we will go with that!

Okay... the heart. How do you do it?
First, you punch a small part in the middle of a strip of scrap paper. I say "middle" - not near the edge - because you want to allow some room for the larger punch to fit around it.

For the sample I used the new Confetti Heart Border punch and then a small heart punch from the Itty Bitty Accents punch pack.
It will also work with the Heart Border punch, if you have that!

On the robot card for tomorrow's scheduled punch class, I used circle punches to create his hands.

Again, by punching the smaller one first more towards the middle of your scrap and then surrounding it with a larger circle:
Then, of course, it needed to be cut in half so he has two hands!

For the mouth, a similar method was used, except that instead of punching the smaller circle towards the middle of the scrap, you take a "bite" out of the edge of the paper:
The larger circle surrounds it and then takes a bigger "bite"!
Then you have a smile that you can use on any project!

Be sure to try this technique with any punches that you may have that are similar designs/shapes yet different in size (ovals, squares, labels, butterflies, etc.)

(By the way I CASEd this card after watching a "how to" tutorial video by it's creator Dawn O. I will be sure to post a link to the video when I post the punch class projects!)

------


For this card, when I was making alternative projects with the My Paper Pumpkin kit, I used only the Decorative Label punch. But, there is a trick to cutting it so that you can layer it to make it look like you used a larger punch!

First, punch out the piece that you wish to use as the "layer". Then, it's just a matter of drawing a few lines and cutting it!

(Please excuse my shaky lines...)

Once you have your lines drawn, just cut out using your lines as a guide.

Next, you're going to glue it to the back of your main piece, but slightly separate the sections:
Turn it over and voilĂ ! 
You only had one punch, but it looks like you had two!
Have fun trying this with other punches!