Showing posts with label Valentine. Show all posts

Sunday, February 8, 2015

January My Paper Pumpkin kit


Last month's Paper Pumpkin kit has everything you need to make 24 (!) Valentine treat bags!

I'm not kidding! Here's what you get:
So much stuff and, it's really cute too!

But sadly, I no longer have use for 24 treat bags. When my kids were younger and I used to do class treats, I would need that. Not now.

Now, I only need a few of the treat bags that the kit was intended for. I still give my boys surprises on holidays and this year, I've been sending some surprise holiday goodies to some of Joseph's friends that went away to college. Everybody likes to get a surprise in the mail! Especially these days when kids rely on their phones so much, they hardly know what "snail mail" is. 

True story! 

You should have seen the addresses they gave to me when I asked - bits and pieces of information - not in any way resembling correct address form. Holy cow! Times have changed, huh?

They are so not used to checking their mailbox on a daily basis. Proof? One boy told me that he gets an email sent to him that says "you've got mail in your mailbox"! Isn't that funny? 

 When I asked my son to address his graduation "thank yous" this past summer, he did a poor job of addressing. Some comments I heard were, "It's not a useful skill anymore"...  "The post office is going to be obsolete anyway soon. No one sends mail". 

Ha! He hasn't experienced the grown-up responsibility of bills yet! He'll have those college loans to pay too… 

Maybe he is right - you can even pay bills online now... Hmmpf! Technology!

I used the kit to make as many treat bags as I would need:
Then I had tons of leftovers! I still have some more, different, treats to do so I'm sure they will come in handy!

In the meantime though, I put them to use in some things that I found on the Internet....

A card....

See, you can even use the leftover "negative space" scraps! After punching out the hearts, don't throw away what's left over - you can use it like I did here. Even the arrow was made by cutting the "negative space" of one of the tag sheets! - All I did was add a gold foil heart.

Rachel Tessman has two videos out with projects she made with the leftovers:
(LOVE THE FROG CARD!)

I copied her rendition of Project Life page inserts. I have just about everything we offer with our new Project Life line, but haven't used it yet. So, by copying her example, I felt a safe "first fora"y into this new, faster way of scrapbooking:

This was so easy! 

I can only imagine that with the actual Project Life components it will be even easier! All the inserts are cut to size and decorated - and you get fun embellishments in the accessory kits. You really just need to pop pictures into the spaces provided. There is minimal trimming involved and we even offer framelits to do the cutting for you!

** On the top right insert, the arrow was made by cutting one of the red banners from the Paper Pumpkin kit in half and trimming the end:

You just place it behind the other hearts. By doing this, you can make the arrow appear as long as you want!

I had so much fun doing this Project Life page that I just had to finish it with old pictures that I hadn't put in a scrapbook...

More on Project Life in future posts...

For now, do you see how I added an extra Paper Pumpkin kit embellishment in the middle (with our wedding picture)? Again, I used the "negative space" from a tag to frame a portion of our wedding picture. I also added two banners from the kit and added my own gold foil hearts.

Moral of the story...

You can't go wrong by subscribing to our monthly Paper Pumpkin kits! This kit was primarily made for treat bags, but I show here that you can use the kit for other items if you have no need for treat bags.

A 3 month pre-subscription to MPP is on sale during Sale-a-Bration (until March 31)! 

You save $5 and will qualify for a  FREE Sale-a-Bration gift!

Visit my website today to get in on the Paper Pumpkin 3-month subscription special! http://www.stampinup.net/esuite/home/dandyspandy/

Thursday, January 29, 2015

Punch class -"love is in the air"

How does that saying go ? "The best-laid plans of mice and men often go awry".... 

"Love is in the Air" punch class- Wednesday, January 28, 2015 @ 6:30 PM

I had scheduled this punch class for last night but due to the snowstorm we had on Tuesday, I had to cancel because, although my driveway was clear (!), there was nowhere to park!

I will not be rescheduling this class due to time constraints!

Therefore, this class is now available only on a "to go" basis.

Please let me know by Sunday, February 1 if you would like to purchase these un- assembled cards, and I will mail them out to you on Monday. Cost: $10 for a kit to make all three cards (plus envelopes).

I showed you a preview the other day. Now I would like to go over the details so you can assemble them at home.

Card #1: lovebirds
I had this card pinned on my Pinterest "punch cards" board. Unfortunately, I don't remember the original pinner's name, so as to give the credit for this card idea. (sorry!)

Making a chickadee using the bird builder punch is something I had done before.

 A few years back, I had offered a series of punch classes called "birdwatchers". Using the above punch we were able to create a variety of bird species.

Basically, you punch out birds/wings from different colors of card stock, cut them and layer them. A white gel pen and/or a fine-tip black marker will help you make simple eyes.

For the chickadee, you will need to punch out a white bird, a gray bird and a black bird. You also need one gray wing.

In the picture below you can see the blue bird "templates" that I followed for cutting the gray and black birds into pieces:
By doing this, I was able to layer on the white bird a black head and a gray back area. Then, I simply added the gray wing and added sponging to his white breast area.

The branches also come from the same punch.

The hearts were made by using an old Embosslit I had  for the Big Shot called "Fashionable Hearts".


Card #2: robot
I loved this card as soon as I saw it! I even knew who I was going to send it to - my nephew Sam. He is going to love this card! Not only is every four-year-old boy a fan of robots, (and this one is too cute!) BUT what makes it even better is that a Hershey nugget (affixed with some glue dots) fits perfectly to the body:

Aside from the greeting I chose, this is pretty much a CASE of a card by Dawn Olchefske.

It is made with circle punches, a couple of hearts, and a couple pieces of scrap paper! 

The brushed silver strips for arms and legs are accordion-folded at every quarter inch. (2 1/2" x 1/4") You'll probably have longer legs than you want, so be sure to snip a little off so that you can use it for his neck!

Here is the link to her fabulous video which gives you dimensions and explains how to put it all together!


Card #3: phone


How cute is this?

My iPhone is like my "third arm", so making a valentine that looks like a smart phone was a natural choice!


She will have all the dimensions for you there, but basically you start with a 3 x 11" piece of colored card stock and score it at 5 1/2 inches.

To the corner-rounded screen piece you're going to add your "text message".

You can add anything you want when you use the Word Bubble framelits for your Big Shot:
I followed her lead and used greetings from the coordinating Just Sayin' stamp set:
It's a perfect card to give my husband ANYtime because I genuinely miss him as soon as he walks out the door ,and we text each other several times throughout the day. (Aaawww...)

PERFECT!

I love these cards and I know you will too!

If you don't own all the punches why not try my class "to go"?

I will do all the punching and stamping for you! The only thing you need to do is glue! (As always, I highly recommend Tombow Multi glue because it's great for using on small pieces that we often encounter in punch class.)

If you do decide to take me up on this offer, please email me or leave a comment below by this Sunday and I will send you my address so you can send your cash or check.


Sunday, January 25, 2015

Punch class preview-"Love is in the air"


Here is a preview of the cute "love" cards that I'm doing Wednesday night.

Or, at least I hope to be doing them Wednesday night!

The weatherman have said that we're going to get a massive snowstorm on Tuesday.... I have a feeling we're going to still be digging out on Wednesday.

Only time will tell.
They've been wrong before!

That said, let me use this blog post as a reminder of the class that I intend on doing this Wednesday night, 6:30PM.

$8 for these three great cards and envelopes!

BUT (and this may be an important "but" right now, in light of the weather forecast), as with all of my recent punch classes this one is available "to go".

For $10, you will have mailed to you the card kit - UNASSEMBLED - and the three envelopes!

On Thursday my blog post will talk about each card in particular and little tips you may need to know in order to assemble them.

You can RSVP for the punch class or the to go version either by commenting on this blog post or by sending me an email at: Dandyspandy@sbcglobal.net

"To go" kits Will be sent out on Monday, February 2. Your  cash/check payment is gladly appreciated before then.

Let's keep our fingers crossed! THESE ARE TOO CUTE TO MISS!

I'm definitely looking forward to warm weather!


Friday, February 14, 2014

What's cooking? - Valentine treats!

In my quest to make all of my Pinterest recipes, (impossible!) I have inundated my family with enough sugar to last a lifetime!

Seriously, I love doing this stuff! ...And they love eating it! So, it's all good! 

The feeding frenzy began last night as I made a quick bread for dessert.
Sweet soft cherry bread with almond cherry glaze

This bread was so good - even though the cherry glaze looks nauseatingly like Pepto-Bismol! If you've ever had a cherry  cake donut from Dunkin' Donuts, it tastes just like that - only better! 

The bread and the glaze are both made with maraschino cherries, thus the pink color of the glaze. The glaze is a lot thicker on the original recipe site - not sure where I went wrong with the thickness, but it still tasted just as good.

This is definitely a keeper for any time of year, not just Valentine's Day. It would be great to serve to friends at teatime!

Here's the link:
http://www.averiecooks.com/2014/02/sweet-soft-cherry-bread-with-cherry-almond-glaze.html

 
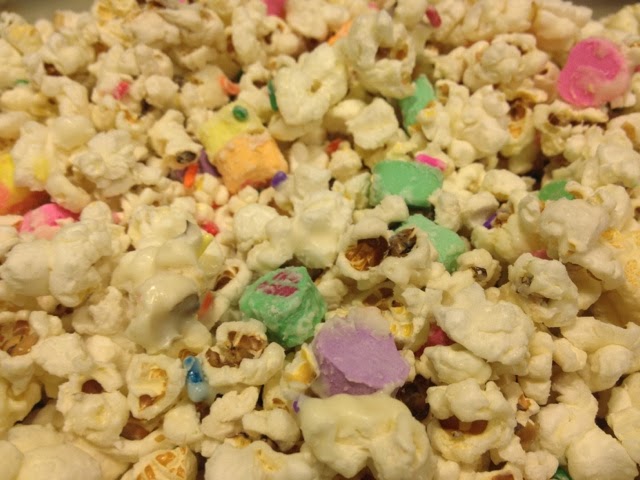
Valentine popcorn crunch

...A little something to snack on that will keep in a Tupperware for a few days.

Make popcorn. Toss with melted white chocolate, colored sprinkles and valentine conversation hearts!
------
A special Valentine breakfast: 
Strawberry stuffed French toast

In between two slices of French toast is a creamy strawberry filling, and it is topped with a fresh strawberry sauce. 

For the filling :
Combine 4 ounces cream cheese (I used strawberry flavored) 
1/4 c finely chopped fresh strawberries 
1 - 8 oz container of strawberry yogurt 

For the sauce:
1 c fresh strawberries, chopped
1/4 c sugar
2 - 4 T water
Combine in a small sauce pot. Heat to boiling over moderate heat. Reduce heat and simmer until sauce is thickened (about five minutes). Sauce will thicken more upon cooling (I refrigerated mine until I was ready to use it).

I also sprinkled powdered sugar over it all before serving.
------
Finally, after our dinner , we enjoyed chocolate fondue.
I have never seen four people descend upon food as quickly as my family...

...But we enjoyed it. My youngest son told me that he was looking forward to that all week. That made this sugar high all worthwhile!

My oldest son made the fondue by simply combining one can sweetened condensed milk with 1 c semi sweet chocolate chips. He heated it on the stove over low heat, stirring constantly, until it was completely melted.

We served it with: pretzels, marshmallows, bananas, strawberries and wafer cookies. Be creative! Fondue
is  fun!

File these recipes away for next year!
You'll be glad you did!

Flashback Friday! - a Valentine treat

Happy Valentine's Day, everyone!

This project was from stamp club just a few years ago; but I thought it too cute not to revisit!

I bought small Chinese takeout containers at the local party store. We made  "fortune cookies" out of little, felt circles and filled them with Hershey kisses and "a fortune". 

The container and the "fortune" were decorated using Stampin' Up! stamps, of course!

This was such a cute gift to give to a loved one or a friend!

Monday, January 27, 2014

January stamp club project #1

This is a card that we made in this month's stamp club. 

We are getting ready for Valentine's Day!

It is a CASE of a card by a demonstrator named Janice Sinko. (If you are not familiar with this term that I use regularly, CASE stands for "copy and share everything.)

Isn't it a romantic looking card?

We used very vanilla card stock for the base and also the other two pieces- the postcard layer and the lattice piece that was cut out with the Big Shot.

We used the heart framelit set for the Big Shot to cut out the frame in the postcard layer and the other two small hearts. The larger of the two is made of a retired designer series paper that I had downstairs. The smallest heart, on the front of the card, was made out of cherry cobbler core'dinations card stock.

We ran the vanilla postcard through the Big Shot with the elegant fan embossing folder.

We glued the lattice piece behind the open-heart  frame on the postcard layer.

The small heart was embossed with the dotted embossing folder. Since it was done with the core'dinations card stock we could then sand away some of the color on the raised dots and on the edges for a vintage look.

After gluing everything down and layering the postcard with dimensionals, we added embellishments and such as: a pearl, ribbon roses, and lace ribbon.

We added a Valentine sentiment inside using cherry cobbler ink.

This card is pretty - too pretty to give to a man! Don't you think ? Maybe I will send it to my mother and make another one for my husband!

As always if you have questions just send me an email or leave a comment on this blog.

For ordering product,you can go to my website and click on "store". Go to: 


And why you're there, don't forget that new weekly specials were announced today!

Today is also the first day of our annual Sale-a-bration event! Spend $50 and you get something from the brochure FREE!(available for viewing online) 

Happy Stamping!