Thursday, February 26, 2015

February punch class-"Over the Hill"!

As the winter in New England dictates, my classes for February are only being offered on a "to go" basis.

It's too cold to go out and we have a lot of snow up here (with limited parking).

Getting together to "yuk it up" while stamping will have to wait until it gets a little warmer.

But you don't have to miss out on fabulous cards!

These are the cards I created for the February "Over the Hill" punch card class.

All three are birthday cards meant for "older" recipients (or, sadly, my age bracket!)

For just $10, you will receive in the mail an unassembled kit (and envelopes ) for creating the three cards you see here!

You can leave a comment below or email me with your request. I will need your $10 check, payable to me, Danielle George, no later than March 7.

I will also need your address (!) so that I can mail the kit out to you.

Here are notes about each card so that when you're you get your kit you can refer to this blog post:

Card #1:

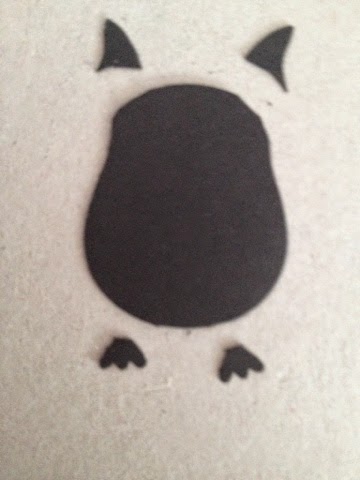
The penguin is made from the owl punch! 

Here is a step-by-step picture tutorial on how to create the penguin: (Please excuse the gold glitter on my silicone mat!)
• Cut off for the ears and feet of one black owl.

• Glue a scrap from an orange owl so that your "penguin" now has two orange feet. (does not matter what the scrap looks like!

•Add a white "vest" and an orange heart (pieces made with the owl punch)


• Add white eyes and make black pupils with a marker. (The punch also can make these but they are just too small to handle!)

• From a second black owl, cut out wings as shown:
• Tear a piece of white card stock and half to appear as a snowy hill!

Card #2:

This one is easy peasy!

•Glue a colored 1/2" card stock circle to the black 1 1/4" circle, then make a hole right in the middle with either a paper piercing tool or a 1/16 " hole punch.

•Add a small brad.

•Attach to card with dimensionals.

Card #3:
Believe it or not, this card is made again with the aid of the owl punch!

Each balloon requires that you cut 1 foot off of an owl. Leave yourself a little piece to adhere glue!

I talked baker's twine with a glue dot. Each balloon was then attached to the silver glimmer paper with a Dimensional.
(I also added accents with my white gel pen on the black balloons.)

A glue dot holds all the balloon strings in place before the bow is attached.

Ready to be given!

Sunday, February 8, 2015

January My Paper Pumpkin kit


Last month's Paper Pumpkin kit has everything you need to make 24 (!) Valentine treat bags!

I'm not kidding! Here's what you get:
So much stuff and, it's really cute too!

But sadly, I no longer have use for 24 treat bags. When my kids were younger and I used to do class treats, I would need that. Not now.

Now, I only need a few of the treat bags that the kit was intended for. I still give my boys surprises on holidays and this year, I've been sending some surprise holiday goodies to some of Joseph's friends that went away to college. Everybody likes to get a surprise in the mail! Especially these days when kids rely on their phones so much, they hardly know what "snail mail" is. 

True story! 

You should have seen the addresses they gave to me when I asked - bits and pieces of information - not in any way resembling correct address form. Holy cow! Times have changed, huh?

They are so not used to checking their mailbox on a daily basis. Proof? One boy told me that he gets an email sent to him that says "you've got mail in your mailbox"! Isn't that funny? 

 When I asked my son to address his graduation "thank yous" this past summer, he did a poor job of addressing. Some comments I heard were, "It's not a useful skill anymore"...  "The post office is going to be obsolete anyway soon. No one sends mail". 

Ha! He hasn't experienced the grown-up responsibility of bills yet! He'll have those college loans to pay too… 

Maybe he is right - you can even pay bills online now... Hmmpf! Technology!

I used the kit to make as many treat bags as I would need:
Then I had tons of leftovers! I still have some more, different, treats to do so I'm sure they will come in handy!

In the meantime though, I put them to use in some things that I found on the Internet....

A card....

See, you can even use the leftover "negative space" scraps! After punching out the hearts, don't throw away what's left over - you can use it like I did here. Even the arrow was made by cutting the "negative space" of one of the tag sheets! - All I did was add a gold foil heart.

Rachel Tessman has two videos out with projects she made with the leftovers:
(LOVE THE FROG CARD!)

I copied her rendition of Project Life page inserts. I have just about everything we offer with our new Project Life line, but haven't used it yet. So, by copying her example, I felt a safe "first fora"y into this new, faster way of scrapbooking:

This was so easy! 

I can only imagine that with the actual Project Life components it will be even easier! All the inserts are cut to size and decorated - and you get fun embellishments in the accessory kits. You really just need to pop pictures into the spaces provided. There is minimal trimming involved and we even offer framelits to do the cutting for you!

** On the top right insert, the arrow was made by cutting one of the red banners from the Paper Pumpkin kit in half and trimming the end:

You just place it behind the other hearts. By doing this, you can make the arrow appear as long as you want!

I had so much fun doing this Project Life page that I just had to finish it with old pictures that I hadn't put in a scrapbook...

More on Project Life in future posts...

For now, do you see how I added an extra Paper Pumpkin kit embellishment in the middle (with our wedding picture)? Again, I used the "negative space" from a tag to frame a portion of our wedding picture. I also added two banners from the kit and added my own gold foil hearts.

Moral of the story...

You can't go wrong by subscribing to our monthly Paper Pumpkin kits! This kit was primarily made for treat bags, but I show here that you can use the kit for other items if you have no need for treat bags.

A 3 month pre-subscription to MPP is on sale during Sale-a-Bration (until March 31)! 

You save $5 and will qualify for a  FREE Sale-a-Bration gift!

Visit my website today to get in on the Paper Pumpkin 3-month subscription special! http://www.stampinup.net/esuite/home/dandyspandy/

Wednesday, February 4, 2015

What's cookin'? - Loaded Baked Potato Casserole

What can I say about this?


Hmmm... SO WORTH THE EXTRA CALORIES!

This was a different side dish for the steaks we were having. I highly recommend this if you are enjoying a steak dinner and are tired of the usual baked potato! If you're going to load it with all that fattening goodness anyway, you might as well make a whole bunch of it. 

"Go big or go home", I say!


I found this recipe here:

I call it "loaded baked potato casserole" because it looks like a "loaded baked potato" more than "twice baked potatoes". Do you know what I mean? "twice baked potatoes" are usually mashed and then rebaked?

That's just me being fussy - you call it whatever you want!

Loaded Baked Potato Casserole

•4-5 large russet potatoes
- clean potatoes
- rub skin with olive oil
- rub coarse sea salt over outside skin
- bake in 400° oven about 45 minutes until can be easily pierced with a fork- flip halfway through baking time 

** I baked my potatoes the old-fashioned way - in an oven. I usually use the microwave for this! But, by putting them in the oven, I got a nice, crispy skin. Since these potatoes won't be peeled before adding them to the casserole, I found this to be essential!

- Remove potatoes from oven. Allow to cool at least 15 minutes. REDUCE OVEN TEMPERATURE TO 350°

-In the meantime, cook 3/4 lb. bacon. Drain grease by placing the bacon on paper towels. When cooled, crumble.

-Chop 5 to 6 green onions.

-(Set aside about 2 T onion, 2 T bacon and 1/3 c shredded sharp cheddar cheese for topping)

-In a large bowl, mix together: 
•3/4c mayonnaise
•1/2c sour cream
•Chopped green onions
•Bacon
•Remaining shredded cheddar cheese

-Cut potatoes into chunks, leaving skin on. (it's perfectly natural for them to fall off or even for the potatoes to fall apart somewhat!)

-Add potatoes to mixture, pour into a 13 x 9" pan.


-Bake covered on 350° for one half hour.
-Remove cover during last 10 minutes.
-Sprinkle top with remaining cheese, onion, and bacon before serving


Run a lap!


Tuesday, February 3, 2015

What's cookin'? - Manaste (beans and greens soup)


Yesterday it was cold and snowy. I of course made soup - I swear, I could live on the stuff. My husband likes every soup I make. I have a feeling that when the boys are on their own we will eat soup every day! (A different kind every day, naturally, I have that many recipes!)

 I followed my mother's recipes for "Manaste". I hadn't made it in years, but it is a recipe I have grown up with, and I simply love when my mother makes it. In fact, when she stayed with us for a while after I got out of the hospital a few years ago, that was one of my requested recipes. It always is!

Today I looked up "Manaste" on Google and a few different recipes came up! What they all had in common was this: beans and greens. However, none of the recipes that I found were a soup. This may actually be a unique recipe to the Barone family! 

Like making Italian wedding soup, there are several steps in preparation, so allow for some time making this one! 

Manaste

• 2 heads escarole
• 1 lb. Country ribs
• 1 stick pepperoni
• 1 can Whole peeled tomatoes, broken up
• 2 cans White beans (I used cannellini beans)
• grated Parmesan cheese

Step 1: Cut or tear up escarole  leaves. Place in a large stock pot and cover with water. Cook on medium high heat for at least one hour (leaves will be wilty).


Step 2: In a frying pan, brown ribs well  on both sides in 1 tablespoon olive oil, over medium heat. Remove meat and cut into bite-size pieces. Add to soup pot . (Be sure to include a few bones ! This flavors the broth more!)


Step 3: Slice pepperoni into 1/4 inch- thick slices. In a separate small sauce pot, add enough water to cover the pepperoni slices. Bring to a boil and allow to boil five minutes (this removes a lot of the grease!) Drain about half of the pepperoni water and add the rest (including the meat!) to the soup pot.


Step 4: Add the broken-up tomatoes and their juice.

Step 5: Add the canned beans and their juices.


Step 6: add a GENEROUS pinch of salt and about 1/4 cup of grated cheese.


Serve with additional grated cheese if desired.


Total cooking time: 1 1/2 to 2 hours

(Make sure you have some good Italian bread and butter for this, too!)

Monday, February 2, 2015

What's Cookin'? - Cannoli Cake!

So, this happened today....

Can I just say, "YUM!!!"?

It snowed all day today.
Of course I made soup - an Italian soup that I grew up with called "Manaste". 


It's an odd concoction of ingredients (country ribs, pepperoni, escarole, white beans, tomatoes) and I love this soup.

Before my youngest son tried it (and liked it!), he named it "mah-nasty".

Funny, but unfair!

He later retracted that comment....

My mom used to make this soup a couple of times each year. I haven't made this soup in years! I was due. Today was the day.

Of course, we had to have an "Italian" dessert as well!

I found this Cannoli Poke Cake here:
http://lemon-sugar.com/?s=Cannoli+cake

I followed her recipe with a few variations:

-I did the substitutions "to make a boxed cake better", and 
- in the end I added some coconut milk instead of sweetened condensed milk.

This was a wonderful cake! We all enjoyed it! The frosting is divine- tastes just like cannoli filling!

If you prefer a cake with a sweet, buttercream frosting - this it is not the cake that you're looking for.

But, believe me when I say you won't be sorry for making this one!

Cannoli Poke Cake

• boxed white cake mix plus ingredients to make cake as directed on box (or follow my instructions below to "make any boxed cake better")
--------
•1 1/2 c ricotta cheese
•1 container (8 ounces) marscapone cheese
• 1t vanilla
• 1c powdered sugar (10x/confectioner's)
• 1/2t cinnamon
• 2 cans sweetened condensed milk (I used 1 can and 1/2 cup of coconut milk)
• 1/2c(?) mini chocolate chips

Bake white cake as directed. (Here is where I followed the directions I found on the Internet to "make any boxed cake better": I added one additional egg than called for on the box - in this case it was one additional egg white, I substituted an equal amount of milk for water, and I substituted an equal amount of softened butter instead of using the oil that it called for on the box)


When the cake, is done remove from oven and allow to cool completely.

When cake is cool, poke holes using a straw or end of a wooden spoon all over the cake about 1 inch away from each other.


Pour one whole can of sweetened condensed milk over cake, allowing milk to fill in holes.


Cover and chill 1 1/2 to 2 hours.


Prepare frosting:
Using a mixer with whip attachment, blend together ricotta cheese, marscapone cheese and vanilla.

Add in one cup sugar and 1/2 teaspoon cinnamon.

Turn to high-speed ,beat in 1/2 cup sweetened condensed milk (you will not use the whole second can; this is where I substituted the 1/2 cup coconut milk, simply because I did not have a second can of the SCM!)

Frost cake (all of the sweetened condensed milk that you poured on initially should now have seeped into the cake).

Sprinkle with mini chocolate chips. (Really? Who measures chocolate chips in this situation? Just sprinkle on as many as you want, I say!)


Keep refrigerated until ready to serve.

For the whole "cannoli experience", sprinkle each piece with powdered sugar just before serving.


Try not to eat the whole cake!

Sunday, February 1, 2015

Stamp storage (Part II) - photopolymer stamps

I LOVE OUR PHOTOPOLYMER STAMPS!
They are totally clear! Say "goodbye" to crooked greetings! Say "hello" to the perfect alignment of alphabets! Didn't use enough pressure when you stamped/image didn't stamp completely? - You can almost always line it up again perfectly and stamp again(!)
They are super sticky! No more having to use to 2-way glue on the backs so that they stick well to the clear blocks!
They are really affordable! When all three stamp types are offered (wood, clear, photopolymer), photopolymer are always the least expensive!

But the issue is always having to contend with them being "sandwiched" in between two sheets of plastic when stored. I don't know about you, but I always found it a chore, albeit a small one, to put them back after use... Does it go this way? Does it go that way?

When SU! first started to sell this kind of stamp they were only available online (we still introduce a new photopolymer stamp set on the first Tuesday of every month, online only). But then when our new catalog arrived, we began to see more and more of these of this type of wonderful stamp being offered! In fact I've noticed that if the stamp set requires careful placement of images, it's only offered in the clear photopolymer.

I was so happy to see that the stamp sets were packaged in a clear case now too, and not just the two sheets of plastic!

But they still were sandwiched between two sheets of acetate even though they were in the plastic case! Ugh! It sounds like a small amount of work, but it was a royal pain-in-the-you know what... open case, peel off top layer of plastic, stamp, put stamp back on plastic sheet, replace top sheet, close case.

Then I watched a video by Mary Fish (http://stampinpretty.typepad.com/and my world changed forever!

Let me explain how I now keep my photopolymer stamps....

First, notice that one sheet of acetate has the printed image on it and one is blank. 

Peel off the one that has the printed image on it, adhere a glue dot
 to each of the four corners, and stick it on the outside of the case (but underneath the plastic liner). When the case is open you should be looking at the printed images backwards! This is easy to see when you have words in the set:
(This is a view of the back of the case and so you can easily see  if you have a complete set, however, when you open the case the images will appear backwards.)

Next, peel off the stamps from the second clear plastic window sheet. You will stick the flat side of the stamp against your plastic DVD case. The image will match that of the other window sheet that you glued to the jacket inside.

Now they are ready to be stored! Everything is in its place and I don't have to fiddle with extra window sheets! 


I keep my extras as just that - extras. Window sheets are always great for shaker cards or other techniques!

Maybe you'll want to place that extra sheet on top of your stamps inside the case. That's up to you. I was happy to bid them adieu!

Aaahhh! I sleep well at night knowing that I took care of this situation!