Showing posts with label Owl. Show all posts

Thursday, June 12, 2014

Owls!

A few weeks ago I had a punch class featuring the Owl Builder punch:
We made three cards using that punch but none were owls! I was trying to show some of the other creative uses for that punch. You can view my post here, and see the three cards that we made:

That night, the class participants told me that they would love another class featuring the owls.

I never want to disappoint, so we had another class last night!  This time we made owls!

Each card features a different colored owl, some have different eyes, some have beaks - it doesn't matter how you make it it, is going to be cute when you are finished!

The nurse!

Her cap the same piece that is used as the owl belly (or vest, as I call it), just turned upside down and glued behind the head!

The red cross on her nurse's cap is a flower from the now-retired Itty-Bitty punch pack.

Finally, she gets the drowsy look from her eyelids, which are made from a single circle of Smoky Slate card stock. It is the same circle as the white eyes included with the owl punch.

Here is the second card:
For punch classes, I often pull from my retired supplies - I have so much stuff I need to get rid of! Like, in the previous card, I used Bashful Blue card stock, which is no longer available. Likewise, this card uses a retired color. Both the card base and the envelope liner are Lucky Limeade, a retired "In Color".
(The Envelope Liner framelits)

We stamped the Hardwood background stamp on the front of the card using Soft Suede ink. 
The card stock is Baked Brown Sugar, so it is a bit lighter.

The owl is also Soft Suede (card stock) with a Daffodil Delight belly. His feet were cut off before gluing him to the black circle and then to the card. 

I used a 2 inch circle from the Circle Framelits set.


I also used the Word Bubbles framelit to cut out the coordinating "woo hoo" from the Just Sayin' stamp set. 
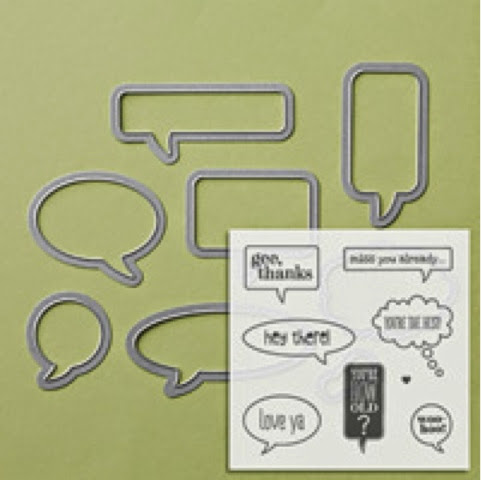
(*Framelits are for the Big Shot.)

The sentiment was stamped in Island Indigo ink. (Of course, I consulted the Color Coach to see which colors would look nice together. I still have the card for Lucky Limeade, so I used that as the point of reference.) Participants had a choice of either "Congratulations" or "Happy Birthday" for the inside of the card.

I should state here that all three cards were inspired from others that I found on the Internet. They are not exact copies!

Here is the front of the third card:
I call the technique "inlaid embossing". Isn't it fabulous? I used all sizes of circles in various Bold Bright colors using my many circle punches. I glued them onto Whisper White card stock first before running it through the Big Shot with the Square Lattice embossing folder. (I also stamped the sentiment first.) The result? You  can't even tell that they were separate circles of paper to start with!

Now here's the owl on the inside:
Isn't he precious?

Again I used a retired DSP (Summer Smooches) to make the owl belly and the envelope flap cover. (Gotta use this stuff up!) Both stamps are also retired.

Couple of things about this how that you need to know:
• He is hanging from a branch that comes from the "Bird on a Branch" builder punch.
• His wings are a piece of Chocolate Chip card stock, made with the 7/8 inch scalloped circle punch, and cut in half.
• This owl has a beak that I free-hand cut out of Pumpkin Pie card stock. (Notice there is no separate beak on the other two cards; you don't really need one if you place the eyes correctly)

** When working with the Owl punch, I have a couple of tips:
1) Have tweezers or a "QuickStik" on hand - there are lots of tiny pieces to work with!
2) Use Tombow multipurpose glue - its pointy tip makes it easier to apply glue to the little pieces! (sooo much easier then the SNAIL tape)
3) Have a container or baggie on hand for all of your "spare owl parts"! They are going to get punched out when you need a particular piece anyway, and you never know when you're going to need them in the future!
4) Have a trashcan nearby! Lots of "paper poop" with this punch!

As always I am here to help if you have any questions!

You can find these products and more by visiting my website at:
Just click on "shop" in the upper right-hand corner!


Monday, May 5, 2014

Owl punch class...


Last week I posted the "minion" card which we made at the owl punch class last Wednesday night.

And, holy smokes! I forgot to post the other two!

Well, here they are now. Better late than never, I guess!

I decided that this class would make three cards with the owl punch, but none of them would be owls! We will have another class in the future with the owls themselves, I promise! 

Believe it or not, these two cards were also made with the owl punch, just like the "minion":

Here is the owl punch itself:
Now, look closely at all of the pieces you get from just one punch... You can do so much with them! 

When working with the very small pieces of the sponge I highly recommend that you have a pair of tweezers on hand (and your bifocals!).

Also use a glue with a pointy tip such as the Tombow multipurpose glue. 
Don't try to use your SNAIL tape - it's too wide and you'll make a mess!

For the first card, we used only the piece that I'd like to call the "vest".

It is so cute when it is transformed into baby clothes hanging on a clothesline!

For little-girl dresses you just simply add a piece of the ruffled trim ribbon with sticky strip.

For boys' overalls, you have to cut an upside down "v" the in the bottom of the vest so that you make pants legs.

Scraps of paper work used to make straps. Tiny pearls were added, along with the heart, from the owl punch, on the overalls.
How stinkin' cute is that?
-----
To make the second card, I showed class participants two different ways that I found on the Internet to make tulips.
Both use the main owl "body".
To make the one on the left you use one owl "body" and then one petal from the Build a Blossom punch (retired). Sponge all edges before gluing down!

That was easy! But you don't have that retired punch - what do you do?

The tulip on the right was made with two owl "bodies". Starting at each of his "ears",  you cut one body into two pieces. Sponge all pieces. Overlap the two that you have cut and glue together. Attach those to the uncut owl body with a dimensional.
This stems are just scraps of green card stock. 

The leaves are also made with the owl "body". Just cut it like you did for the tulip   on the right!

And there you have it! The three cards that we made at the owl punch class - but not an owl in sight!


Wednesday, April 30, 2014

Owl Punch Class-minion!

Are you familiar with adorable, hilarious "minions" from the Despicable Me movies?


Are you familiar with Pharrel's "Happy" song from the second movie?

If you're not, check it out by following this link to YouTube - it will surely make you HAPPY...
http://youtu.be/Q-GLuydiMe4

 Because it is so popular I decided I would make it part of our Owl Punch Class.

Here's the minion I made:
This body is made from the Owl Punch, minus the ears, punched out of Daffodil Delight card stock. He has black Owl feet and then another pair for hands - I added the arms just from scraps. His overalls were punched out of Pacific Point card stock - this is just the Owl "vest".

I gave him googlie eyes and hair, along with goggles, made from scraps and circle punches from the Owl.

Here's the finished card:
How appropriate this greeting is, especially based on the popularity of the song!

There are so many things you can do with Owl punch! Just be patient and have a pair of tweezers (!), as there are many little pieces to work with!


I'll be sure to share the other cards we are making with you soon!

Sunday, February 9, 2014

Valentine's Day cards!

With everybody out of the house tonight I knew it was the perfect time to be alone and make valentines for my guys.

With the guys, they appreciate my handmade cards, but they don't have to be over-the-top fancy. Phew!

With that in mind, I was able to crank three out in just a couple of hours.

The first one is for my husband:
I have seen variations of this in the past so I thought it was time I had made one myself.

Using the owl punch, I simply punched the bodies and put them on the branch from the "bird on a branch" punch. Using dark card stock (in this case it's Basic Gray), I was able to create a silhouette effect against the "moon".

The colors are Rose Red, Blushing Bride, Basic Gray and whisper White. I added Blushing Bride "candy dots" on the greeting. I ended up hiding a mistake with the silver glimmer paper heart above the owls' heads. That came only after the harsh realization that applying glue and silver glitter with the shaky hand does not work well! 

Good thing my husband doesn't tear the card apart to see my errors!

Next, it was time to make cards for my boys. I knew that they couldn't be something real mushy, but a kind of generic, fun valentine that a mom might give it to a son. 

The first one goes to my junkfood junkie.
Appropriate, huh? Believe me, if he could unwrap and eat these for real, he would!

The "kisses" are made from silver glimmer paper using the retired Build a Blossom punch. It's the largest pedal with the ruffled edge cut off!

The three sentiments are all from Teeny Tiny Wishes. They are stamped in Chocolate Chip ink on vellum card stock and cut out using the Itty Bitty Banners framelits. The colors are: Real Red and Chocolate Chip with touches of white and silver - perfect!

The last card I made was for my oldest son. This card fits right into his vocabulary these days:
Leave it to the Yippee Skippy stamp set to have the word "freakin'" in it....

A basic Whisper White card with a layer of Basic Black underneath and Real Red ink is all it took. I used a small heart from the owl punch in the red glimmer card stock.

The neat thing on this card is that I embossed the double hearts using the heart framelits!.You can use your framelits to emboss as well as cut if you do it a certain way.

I used two hearts, one slightly larger than the other. Here is how I layered it on the Big Shot:
•Multipurpose platform, one tab flipped open
•A card-size piece of card stock acting as a shim (you might need two - you have to play with your own machine - you just want to get it tighter!)
•A clear plastic cutting pad
•A silicone pad  This is the squishy one, not the firm crease pad
•piece of card stock to be embossed
•The framelit, cutting-side up
•The second clear cutting pad

Usually, I would caution you against putting the cutting side of the framelit upwards towards your clear plastic cutting pad. But since you are using the squishy silicone mat underneath it, it absorbs the framelit into it - away from the clear pad - as it is passed through the machine, so it doesn't get stuck. It just leaves the impression (embossed) image instead! 

I flipped the card over and used a smaller heart framelit and performed the same procedure . So, I have one heart that "sinks" inward and one heart that is "puffed" outward.

Pretty cool!
Pretty simple cards.

Hope they like them!