Showing posts with label Holiday. Show all posts

Saturday, October 4, 2014

WCMD update!

Thanks to everyone who attended my free Christmas Card "World Cardmaking Day" event! 

I hope you had fun! I know I did!

Today my guests got to play with some of the merchandise from the Holiday catalog: New stamp sets, framelits, and embossing folders!

I thought I would finally share a little detail about the three cards we made today.

The quickest-made card of the bunch seems to be getting the most likes on my Facebook post! It was quite popular at the class too! It's easy and fast to do and it is absolutely gorgeous!


Cardstock: Very Vanilla
Stamps: Cheerful Christmas (Holiday catalog)

Ink: gold Encore pad
Other: Filigree Frame emboss folder for Big Shot (Holiday catalog),

gold emboss powder, rhinestones colored with the Cherry Cobbler (dark) Blendabilities marker
--------
This card features the new stamp set Wondrous Wreath and the matching framelits, that you can purchase as a bundle


SUGGESTION: Anytime you are offered a bundle, I would purchase it! You save money by buying both the stamp set and the framelits together, and it will save you from "fussy cutting" everything out!

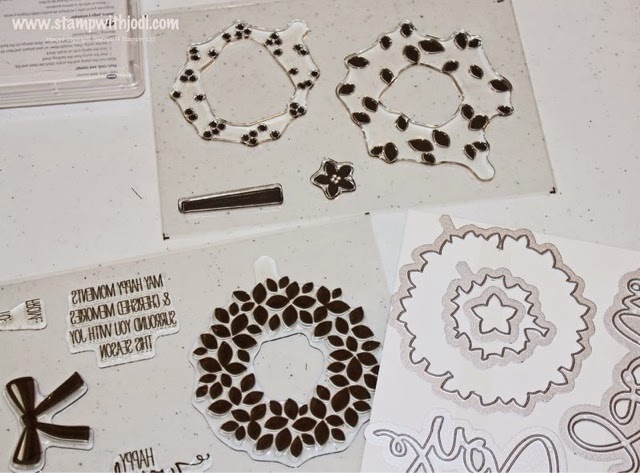
This is a "two-step" stamp set. You stamp the main image in two different colors to get more of the dimensional appearance. In this case, it is the wreath that is stamped in two different colors.

What's different about this set is that both the stamps and the framelits have a little "reference tab" to which I lovingly refer to as the "paddle". Thank goodness it has it! -  It takes the guess work out of lining the images up, especially when you cut them out with the Big Shot. (Don't we wish that we can have that for all of our sets like Flower Shoppe and Flower Patch... Oh well! Better late than never!)

I found this picture on Google, so that you can see the little tabs on the stamps and the metal pieces. See them? I told everyone to point the tabs (AKA "the paddles") towards themselves when they  stamped each time. Then, use a pen to make a dot or a "B" (for "bottom") on your scrap paper. That way, when you go to the Big Shot, you can easily line up the "paddle" of the framelit in the same direction that you did your stamp!
Cardstock: Garden Green, Baked Brown Sugar (on sample, but they used Sahara Sand at class!) and Whisper White.
Ink: Wild Wasabi, Garden Green, Cherry Cobbler and Baked Brown Sugar (with Hardwood stamp for background piece)

Other: Trim the Tree DSP paper stack (Holiday catalog; shown below), rhinestones and Dimensionals.
-----------
The third card had many steps, but the end result was worth it!


It was not difficult, it was just that there were so many different things to do!

Nevertheless, it was an awesome card!


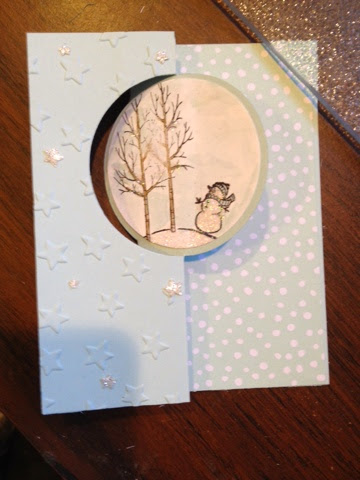
THIS IS MY FAVORITE NEW SET FROM THE HOLIDAY CATALOG!!!!!

It is called White Christmas. It is only sold as a photopolymer set, and thank goodness(!) , because you need perfect placement for some of the elements. With clear photopolymer stamps you are able to do that very easily!


Cardstock: Soft Sky and Whisper White
Ink: black StazOn and Soft Sky (for water colored sky), markers in: Lost Lagoon, Sahara Sand, Tangelo Twist and Baked Brown Sugar
Other: Circle Thinlet die (makes flip card), 

Lucky Stars emboss folder for the Big Shot, 

2 1/2" circle punch, Aqua Painter, 2-Way glue pen, Dazzling Diamonds glitter, Confetti Star Punch (Holiday catalog)
And paper from the new Specialty DSP All is Calm.
 
-----
I was thrilled that everyone seemed pleased with their cards! I'm sure their "card-worthy" recipients (haha) will be just as impressed with them as we were!

THANKS TO PINTEREST FOR THE "PIN-SPIRATION"!

You can always view these items online and make your purchase by visiting the Online Store. Just go to my website, following the link below, and click "shop" in the upper right-hand corner.

While you are there, don't forget to check out the promotion that Stampin' Up! has going on right now!

It's called Stamp, Stock and Save!


It only runs until October 6, which is Monday, so you have to act quickly!

Ink pads, cardstock, a few stamps sets, envelopes and an adhesive are all marked down during this short but fantastic promotion!
-----

We will add to our Christmas card collection at the next 2/5/15 class.

Mark the date - Friday, October 17 at 4 PM! 

Make five different Christmas card designs (two of each card) for only $15!

RSVP by Wednesday, 10/15 please.

You will need to bring adhesive to this class.

I will post pictures for the class as soon as I have the samples ready!

Happy stamping!


Sunday, September 7, 2014

Set Sampler - For All Things


Last week I posted a picture on Facebook of some new product that I had ordered from the new Holiday catalog. 


There is still so much I want to do!!! There are not enough hours in the day! 

But, I did manage to play with the set For All Things the other day. In fact I had every intention of posting this yesterday for "Set Sampler Saturday". But, last night, instead of doing my post as I initially intended, I ended up reading a book from cover to cover. Holy smokes!

So blogging had to wait...

Anyway, on Friday I made several cards using this set. I made all fall cards, but there are several elements that can be used from this set on other occasion cards!

The first is a very simple card, and it is a CASE of a card I saw on Pinterest by Jana Gann. 


The card base is Always Artichoke with a layer of Cajun Craze and Very Vanilla. The leaves were stamped in Hello Honey and Cajun Craze. The acorns and sentiment are done in Early Espresso ink. Burlap ribbon was glued in between the top layers.
----
Card #2 is still simple but involves a little bit of heat embossing. It is a re-creation of a similar card by Stefanie Pletscher:
The card base is Crumb Cake.  The second layer is a piece of Core'dinations card stock (Early Espresso) from the Neutrals pack. I recently bought it off of the clearance rack! I love that "aged" look when you sand it like I did on the edges!

The main image was stamped on Very Vanilla card stock. The inks used were Crumb Cake, Early Espresso, and VersaMark, for the embossed image, which was done with gold powder.

I love the watercolor look that many sets are using this year - this background "blob" can be used with many other sets without really watercoloring (and getting my paper really wet and waiting for it to dry!)
----
My third card was shared on a Facebook group last week by my upline. I loved the colors of it and knew, right away, that I wanted to copy it!

As I was making the card, I once again faced my age old problem: thinking that I own something and I don't.... (I'm sure you've all heard my old story of emailing my downline to see who had a particular  alphabet set of mine - when in fact I really didn't own it, I just thought I did! Whoops...)

In this case it was the yellow (Hello Honey) ribbon! I ordered it but it isn't in my possession yet! DUH!

Well, as soon as it arrives it's going to be added to this card!

See, here is Pam Strobel's original card followed by the one I did: 


It's still looks pretty I just really like it with the Hello Honey ribbon also. Colors of this card are: Lost Lagoon, Hello Honey and Tangelo Twist - ink, ribbon and card stock!

Aren't the colors great? All three of them are In Colors and all five of them (the In Colors) coordinate easily! 

Plus, by stamping the same image repeatedly in different colors, it looks like I used a piece of Designer Series Paper, when in fact it really is just stamped card stock!
-----
The 4th card is not my favorite. 

Did you ever start creating something only to have it end up so busy looking because you used everything that came to mind?

That's this card!

I started out stamping the background. After adding the "splotches" from Gorgeous Grunge, it was too much of the same colors. I tried to break up the color with an accent color (Blackberry Bliss) from the coordinating Color Me Autumn washi tape.

Too much going on!

This one is headed for the trash, for sure!

So, why am I bothering to post it then?

I just wanted to show you what I did with the burlap ribbon!

It looks great when you fray the edges by simply pulling some of the fibers out...

And those loose fibers are used like linen thread in tying this not together!

In my opinion all is not wasted because I have found techniques to use on other cards.

Besides, I don't want you to think that I never make cards that end up in the trash!
-----
Be sure to check out the online store, weekly deals, clearance rack, and new photopolymer sets on Stamping Up's website! You can get there by following this link to my website and clicking on "shop" in the upper right-hand corner:

Wednesday, September 3, 2014

Halloween Street

I had just a little time to play in my stamp room today.

I chose to use my new stamp Halloween Street from the holiday catalog, since it will be the first holiday coming up.


To view it online:

My first project is a CASE of a goodie bag that is in the catalog.


As soon as I saw it in there I knew I wanted to make those!

So fast, so simple, so cute!

It's empty right now but imagine it filled with full-size candy bars.... My boys will be so happy - they are too old to go trick-or-treating anymore!


I used the new food-safe Petite CafĂ© bags. These will come in handy during the Christmas holiday as well, since I plan to make cookies and/or candy this year to give as gifts.


I added a cute tie/bow with our new Tangerine Tango and White Two-tone Trim.


To stamp the sentiment, I used Tangerine Tango ink to match the cord.

The dots were made using a #2 pencil eraser dipped in my black ink pad!
-----

The card I made today uses both new and retired products.
Again, the Halloween Street stamp was used on Tangelo Twist card stock. It was cut out with the Big Shot and the Apothecary Accents framelits.

I used the retired Witches' Brew washi tape 

 that I recently purchased off of the Clearance Rackhttp://www.stampinup.com/ECWeb/ItemList.aspx?categoryid=493

I also used the spiderweb embossing folder. I only used the embossing folder in the upper right-hand quadrant of the card - that's where I wanted the spiderweb to be!

The cute little spider from Googly Ghouls and googly eyes (also retired) were used in the upper right-hand corner.

Rhinestones were added to this sentiment piece and it was adhered with Dimensionals.

There is definitely a third card I would like to make. It's a CASE of something I had seen on Pinterest. I have to wait, though, until my next order arrives because it contains the Dots and Stripes Decorative Masks that I need.

When they get that I will be sure to share it!

Next up... a few fall/Thanksgiving cards.... Or, Christmas if I can't wait to open the sets I received today!

If you did not receive a copy of the holiday mini catalog but would like one please let me know and I will send one out ASAP!

It's chock-full of new stamp sets and accessories for your holiday card making/ gift-giving!

Check out our online store in clearance rack!

Visit my website and click "shop" in the upper right-hand corner: